Cases
There is new functionality for Cases in Version 4 this includes the following:
- Quick access to create a new case from the Dashboard.
- View cases from either a list of cases or a board view based on case statuses.
- Drag and drop to update case status in board view.
- View work orders sent from cases and enhanced filter options.
- Enhanced filter options for cases.
- Ability to save a draft case.
- How to create a new case type, case priority and case status.
- Creating asset categories and assets from within cases.
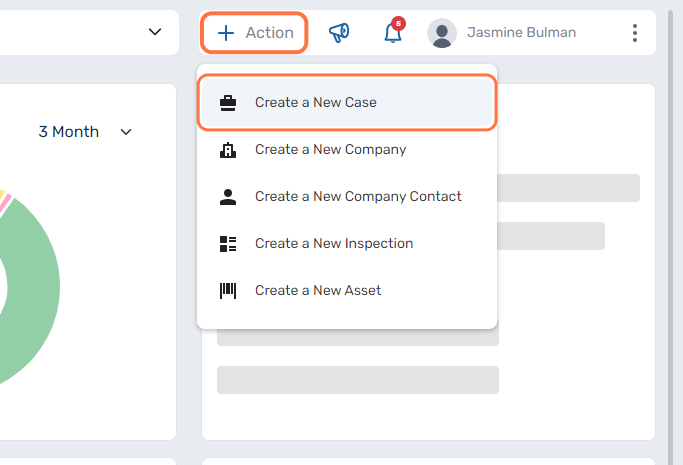
Quick Access to Create a New Case
To create a new case this can be started from the Dashboard now, by selecting Action > Create a New Case.
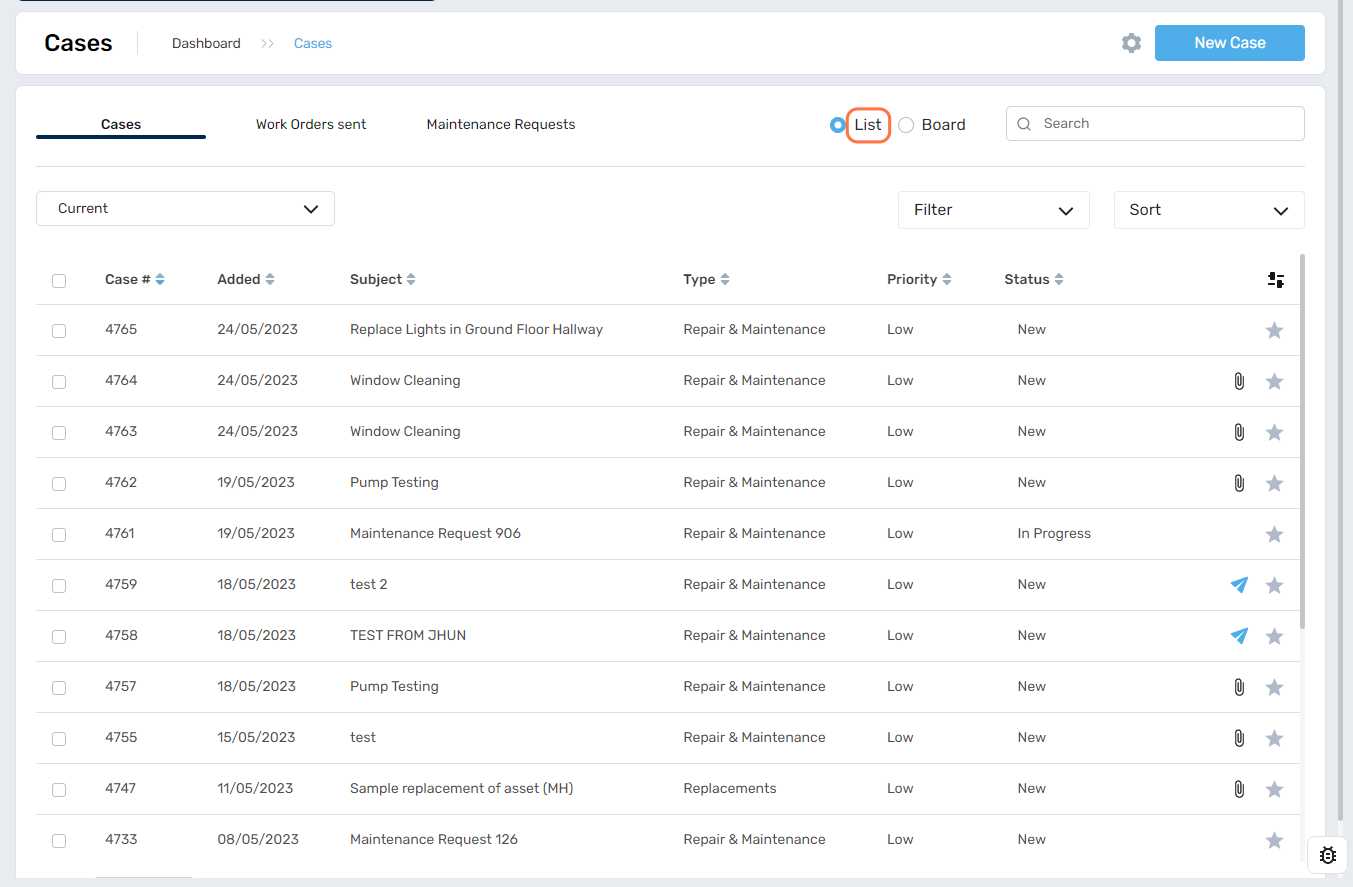
View Cases as Either List or New Board View
There is now an additional view for Cases in addition to the standard list view there is now an interactive board view.
There is an option at the top of the page next to the search bar, where you can select either List or Board.
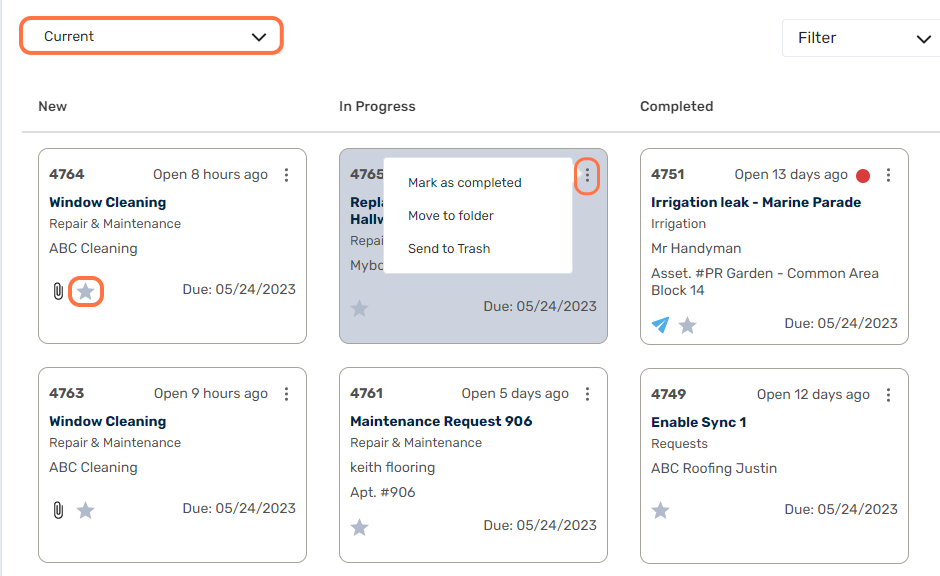
Below you can see the board view it is broken down by columns of the statuses of the cases.
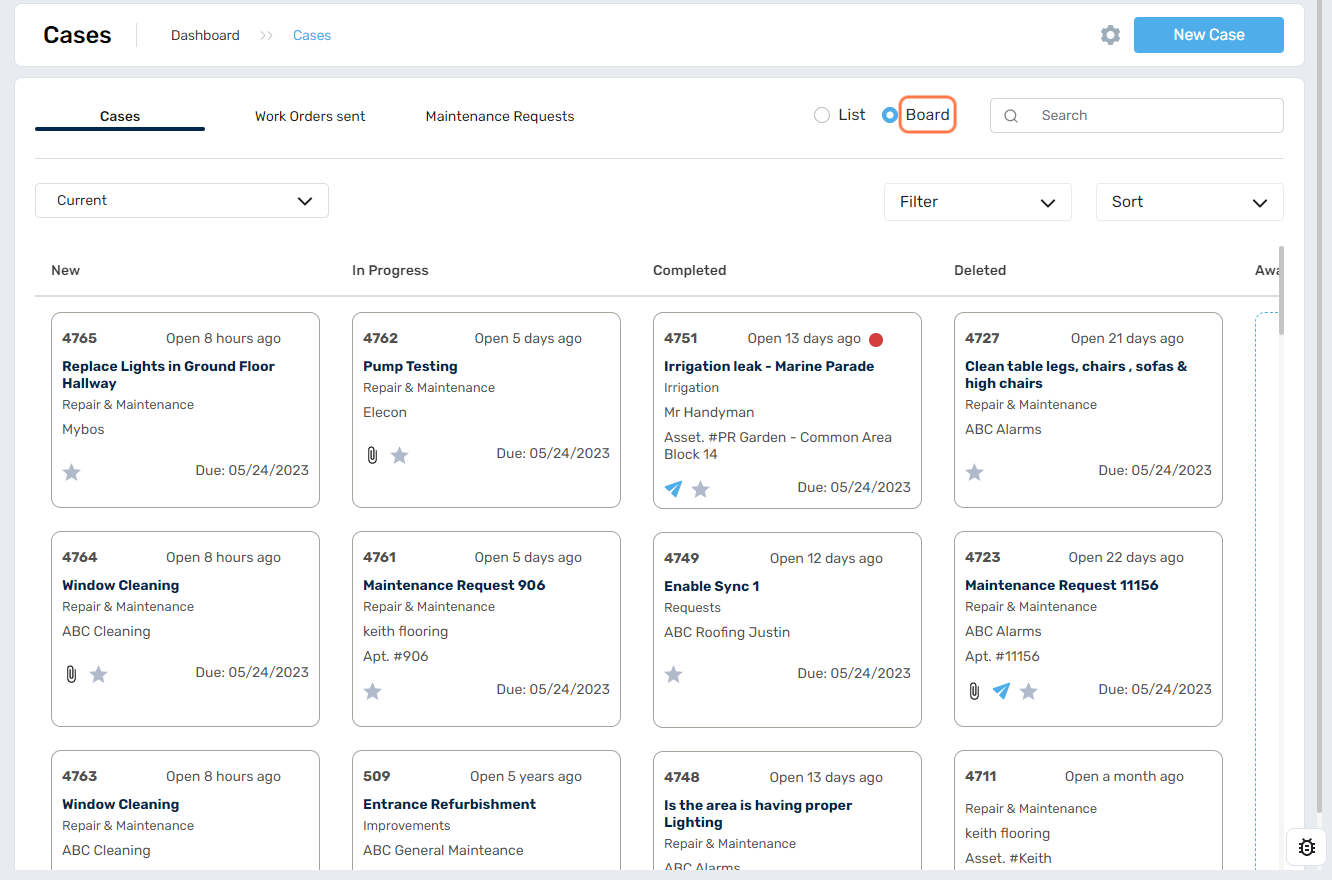
Drag and Drop to Update Case Status
The board view is interactive, similar to the calendar where you can drag and drop maintenance event this functionality has been brought over to cases to update the case status without having to open the case.
Select the case and drag into the status column you wish to update it to.
There are some additional items that can be selected in the board view:
- The three dots outlined below also provides additional options which include completing the case, moving to a folder and moving to trash.
- The star can be selected to mark the case as a favourite and move into the starred file from the dropdown.
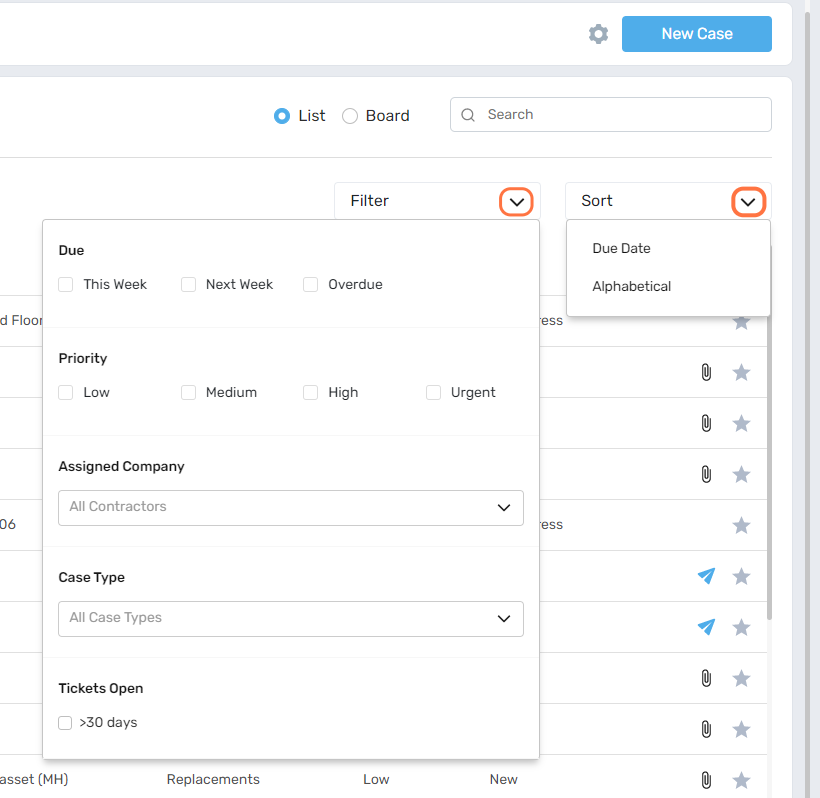
Enhanced Filter Options for Cases
There are multiple filter options for cases under both the list and board views.
There are the following options for Filter, if none are selected all will be included in the view:
- Due - this week, next week and overdue. Only one due date option can be selected.
- Priority - low, medium, high and urgent. Only one priority option can be selected.
- Assigned company - the contractor/s, one or many can be selected from here.
- Case Type - one or many can be selected from here.
- Tickets Open - can filter to view cases over 30 days.
There are two different options for to sort cases by:
- Due Date - by the due date of the case.
- Alphabetical - alphabetical order of the subject of the case.
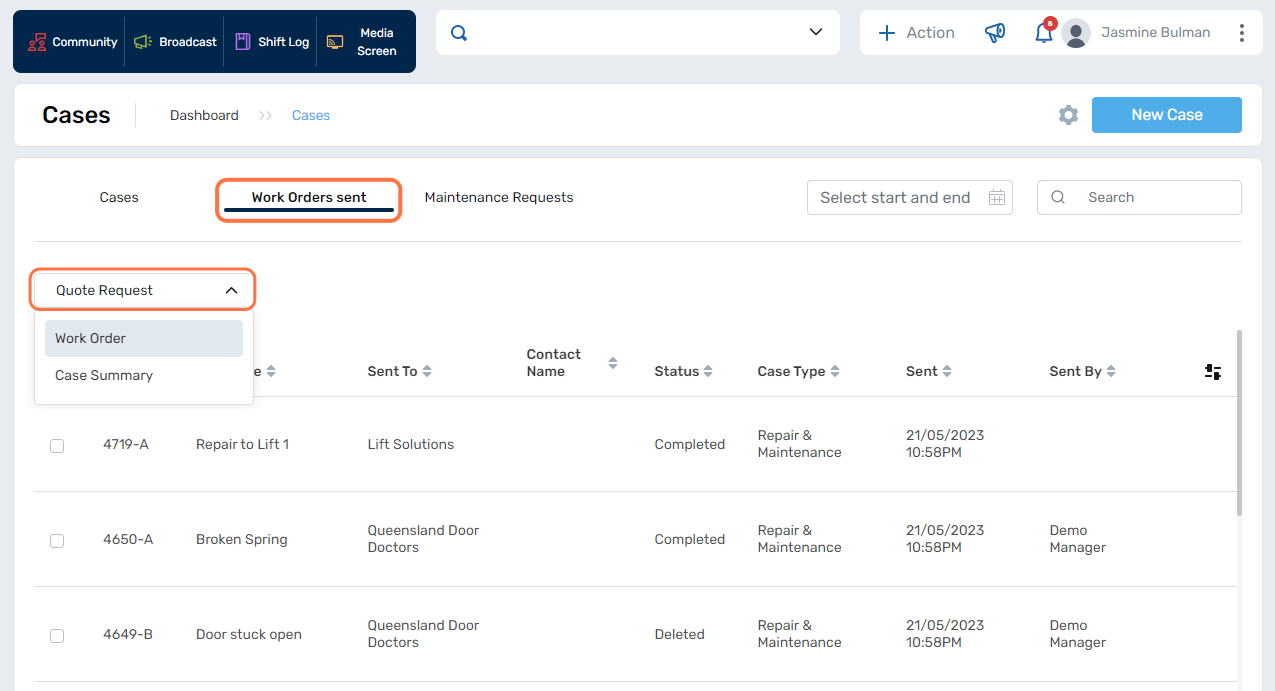
View Work Orders Sent in Cases
Work Orders, Quote Requests and Case Summaries that have been sent out of MYBOS can now be accessed under Cases.
We have added enhanced functionality to the filtering options in the Work Orders Sent section.
Please use the dropdown menu to access the following filter options:
- Quote Request
- Work Order
- Case Summary
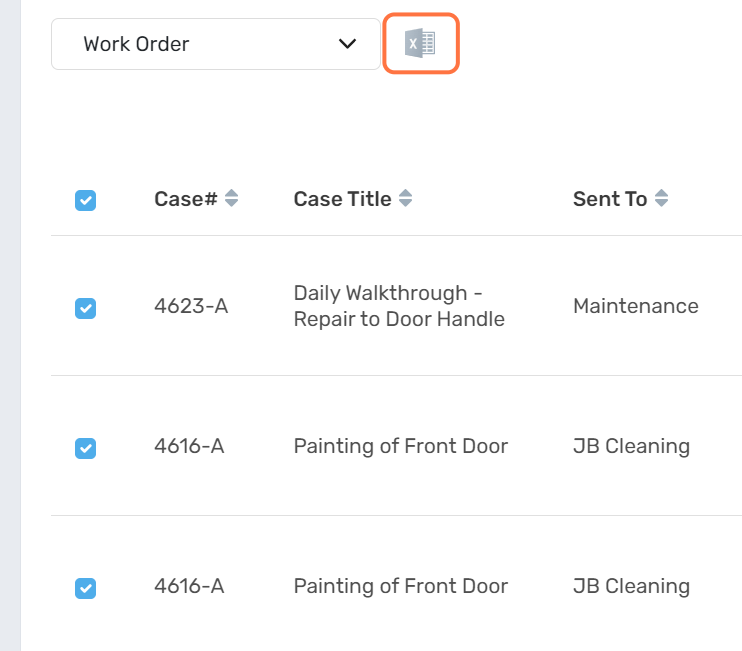
For exporting data to Excel, follow these steps:
- Either select all or choose specific cases you wish to include in the report.
- Upon selection, an 'Export to Excel' button will appear. Click on this to generate an Excel file.
- Open the generated file to review your data.
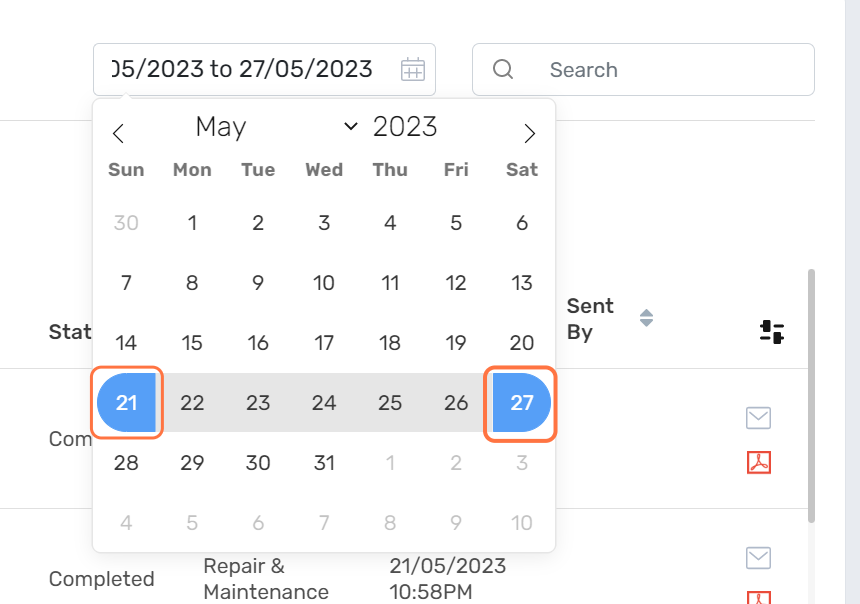
We have made some updates to the date range filter:
- You can now select both the 'from' and 'to' dates within a single calendar view.
Despite these updates, the existing search functionality remains the same. You can still search by the case subject.
Ability to Save a Draft Case
When you are creating a new case in MYBOS, the system will automatically save a draft copy. This means if you urgently have to step away from your desk you will not have to enter all mandatory fields to save.
Under Cases > Select New Case, as soon as you have made a change to any of the fields in the case such as updating a case type, entering any asset information or entering a case type etc the system is going to save this as a draft.
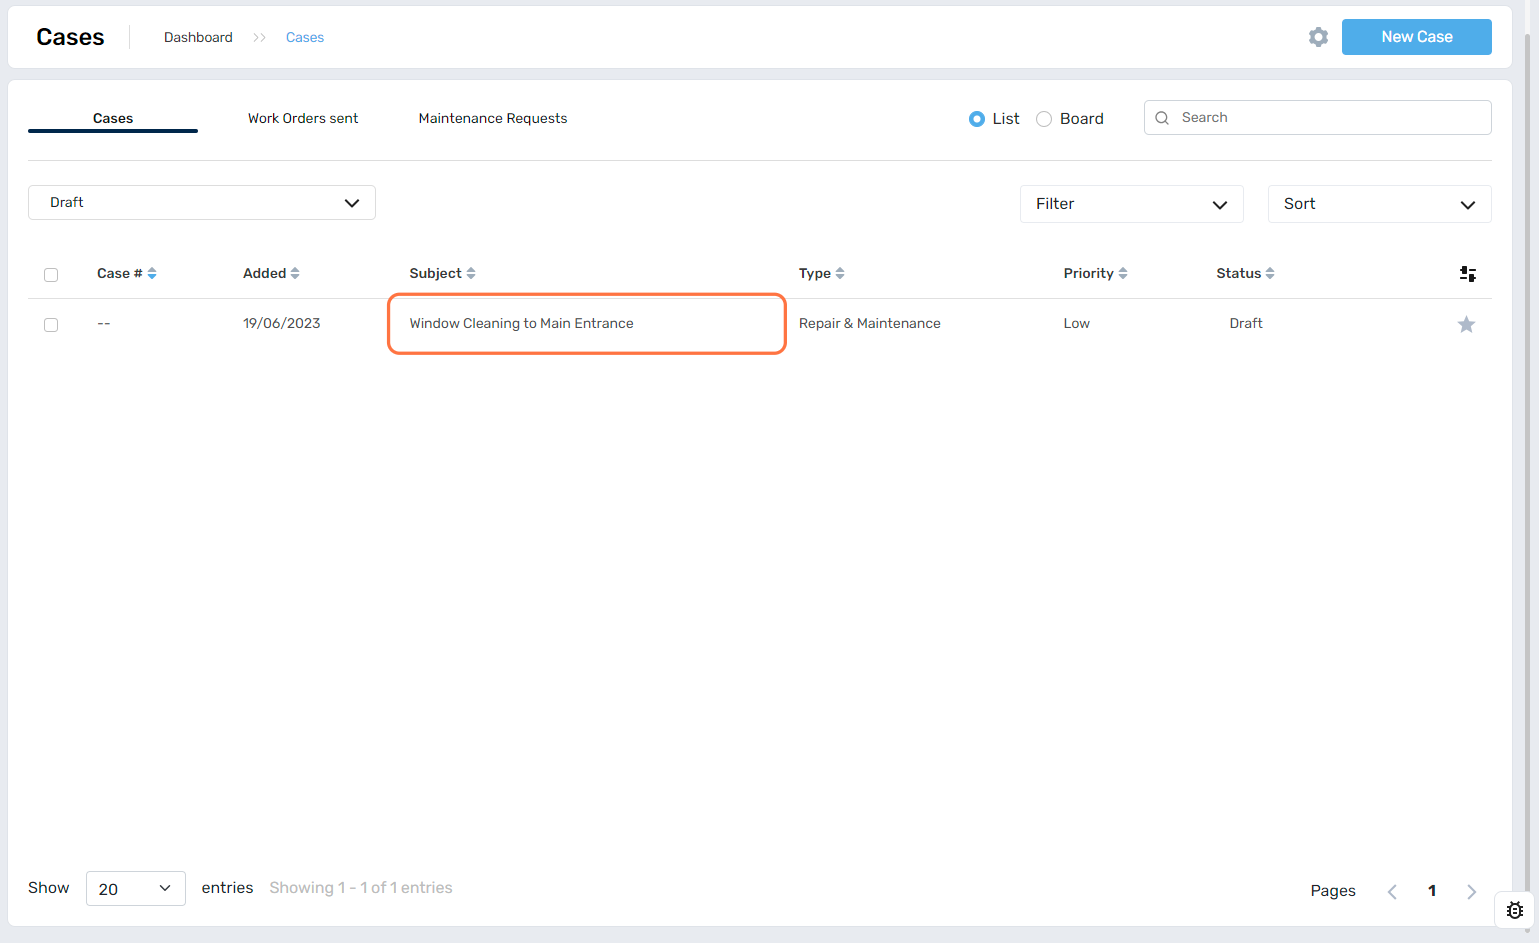
To open up a Draft, select the dropdown and select Draft.
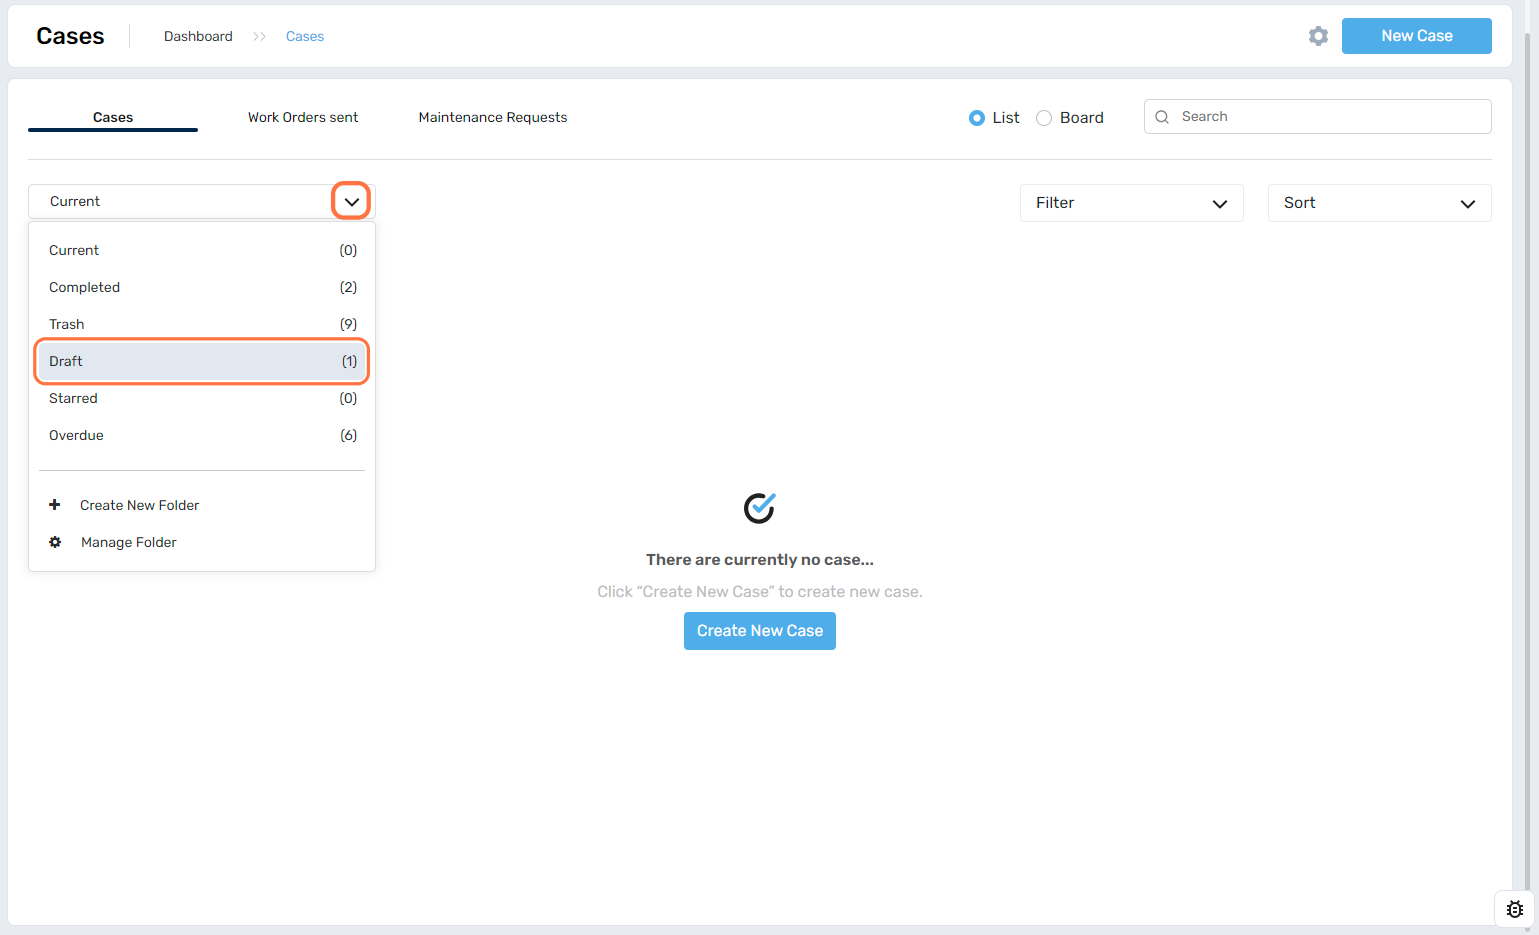
This will filter to just show any Draft cases and you can select to open and continue working on the case from where you left off.
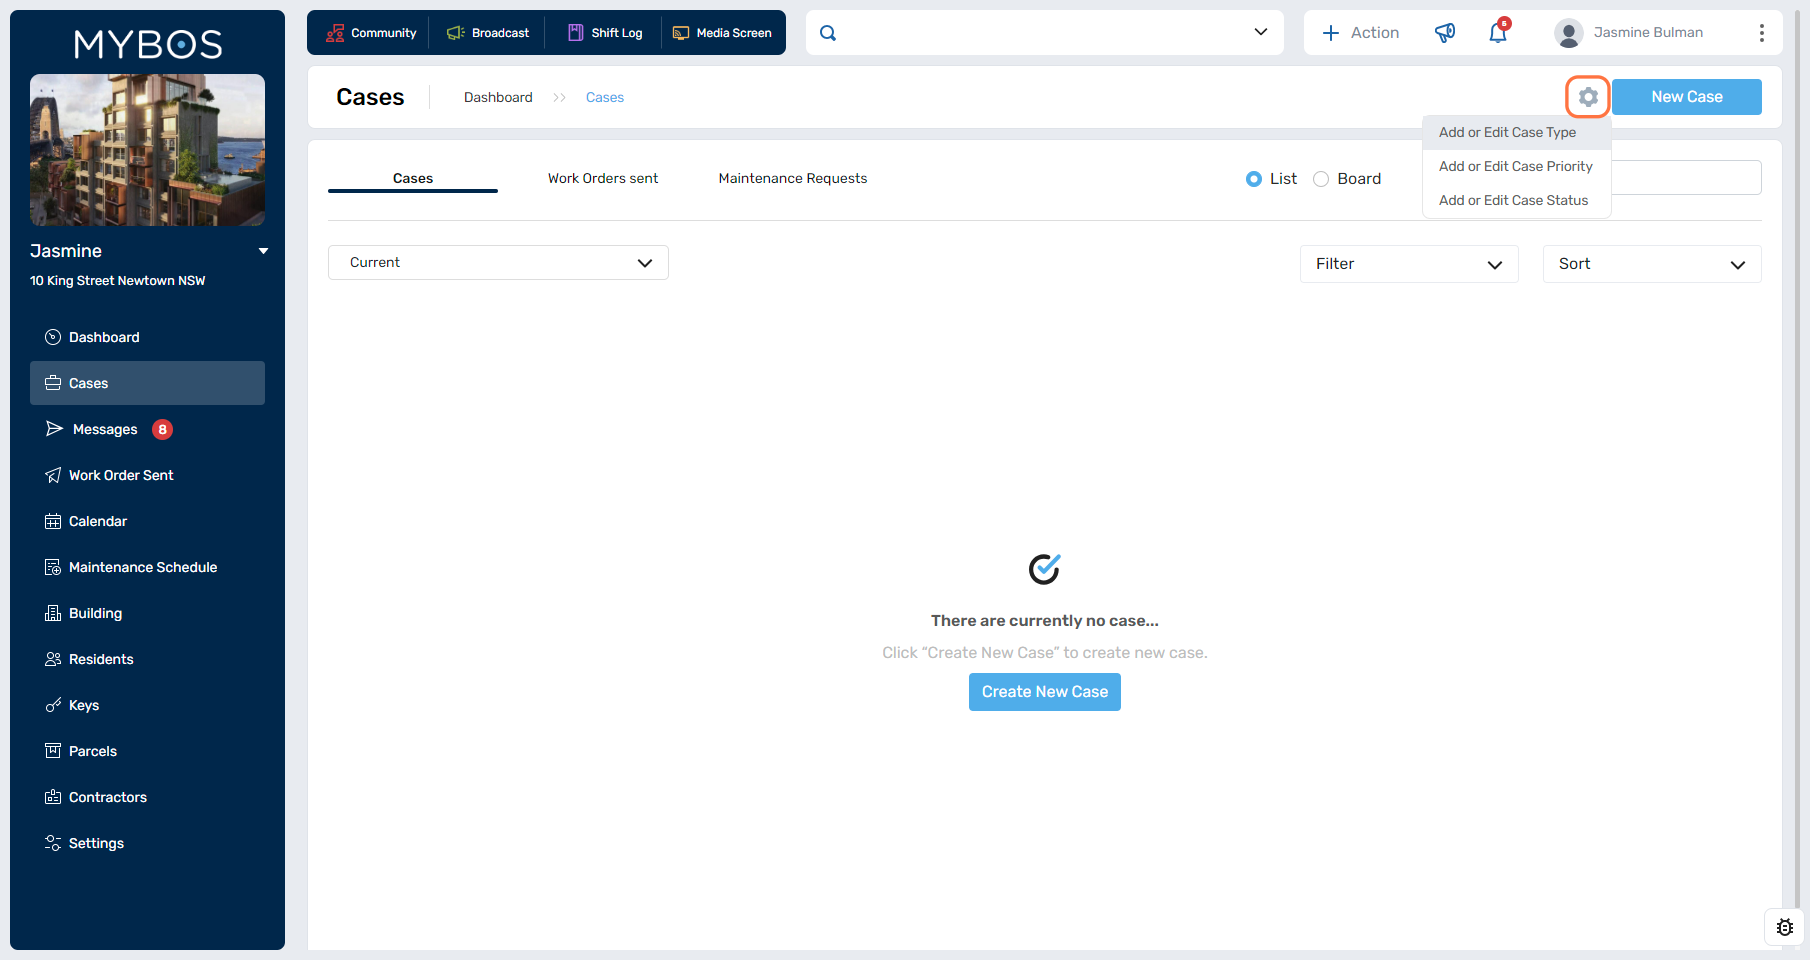
How to Create a New Case Type, Case Priority and Case Status
The same functionality to update case types, statues and now priorities through the gear icon can be completed while creating a case.
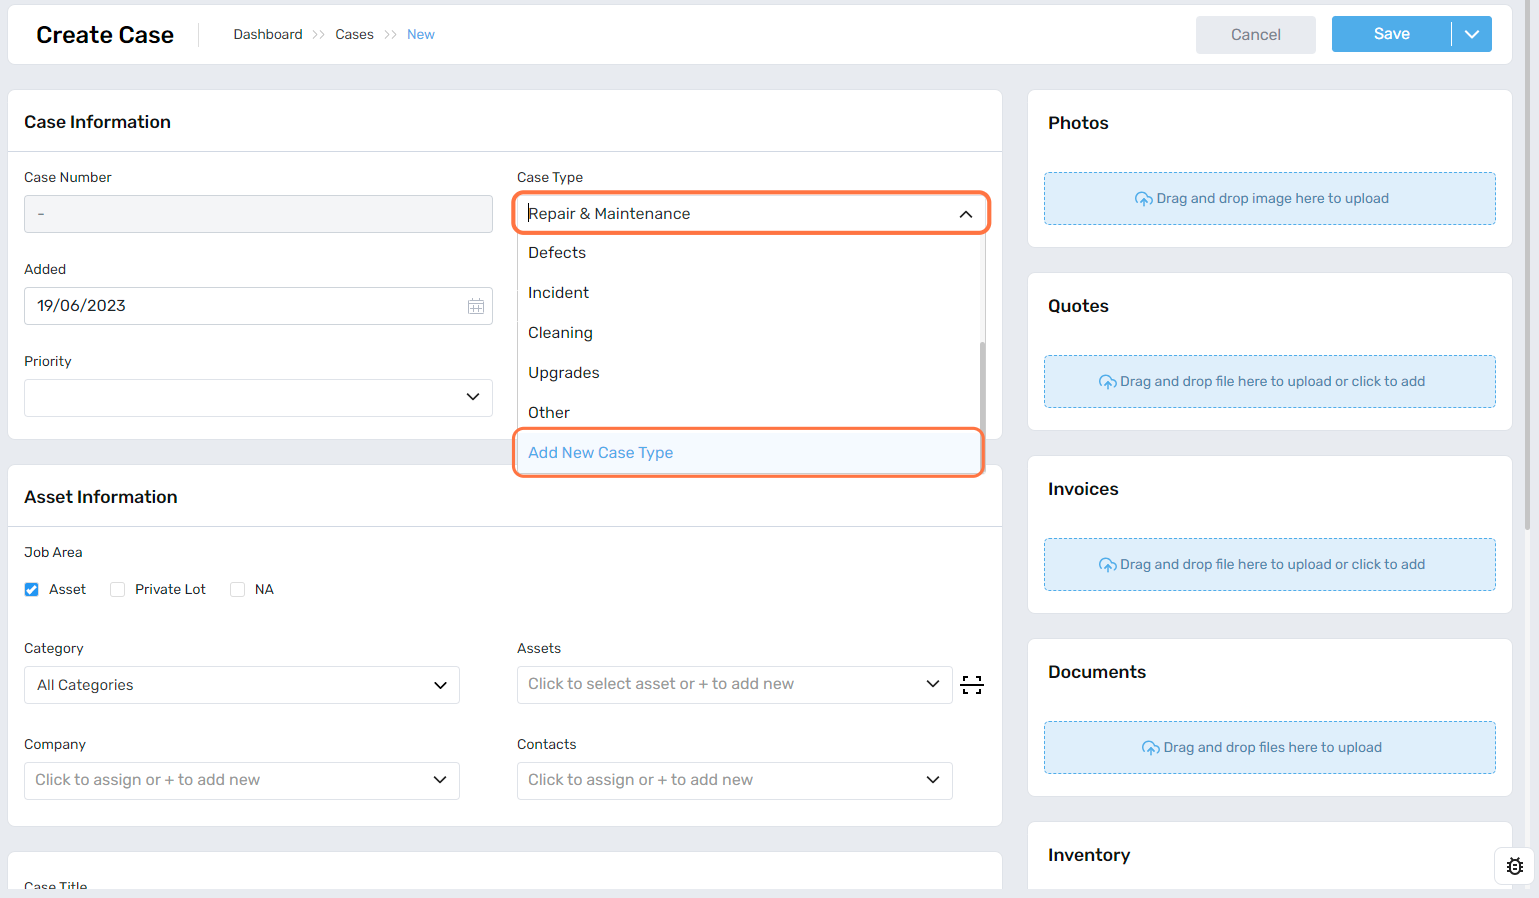
To Create a New Case Type
Under Cases > Select New Case.
From within the case under Case Type > scroll to the bottom and select Add New Case Type.
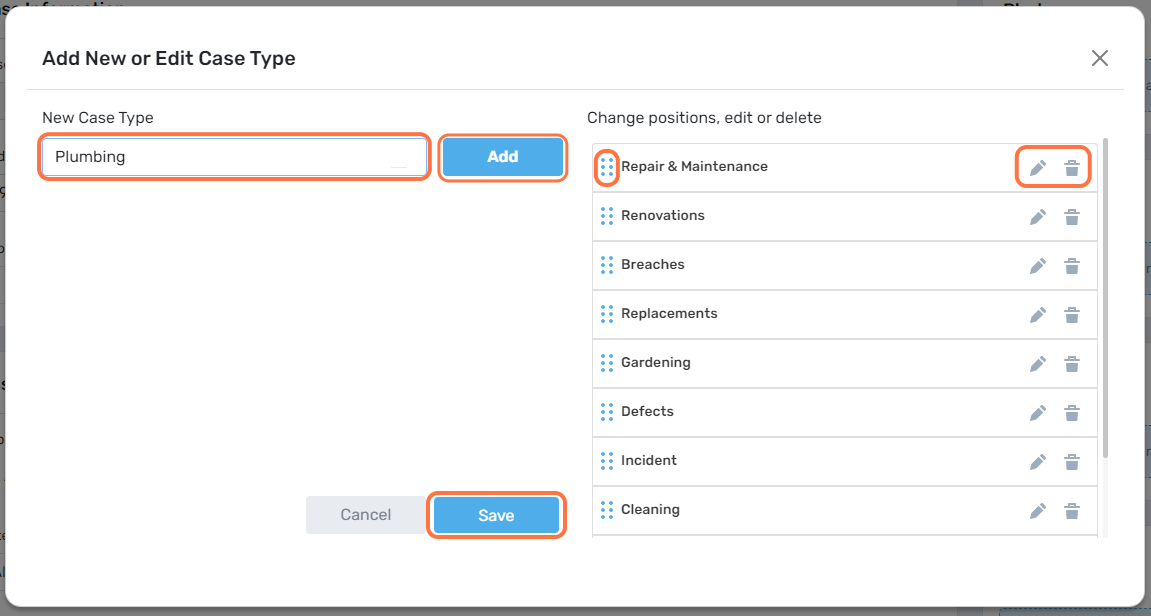
There are a few options from the pop-up that appears which includes:
- Under New Case Type you can enter the new type > select Add and Save.
- The 6 dots you can drag and drop to change the order the case types appear from the dropdown.
- Edit pencil allows you to edit the name of the case type.
- Rubbish bin allows you to delete any case types. There will be an addition pop-up that will appear asking you "Are you sure you want to delete this?" where you can confirm to delete or close to cancel.
Please ensure after making any changes you select on Save.
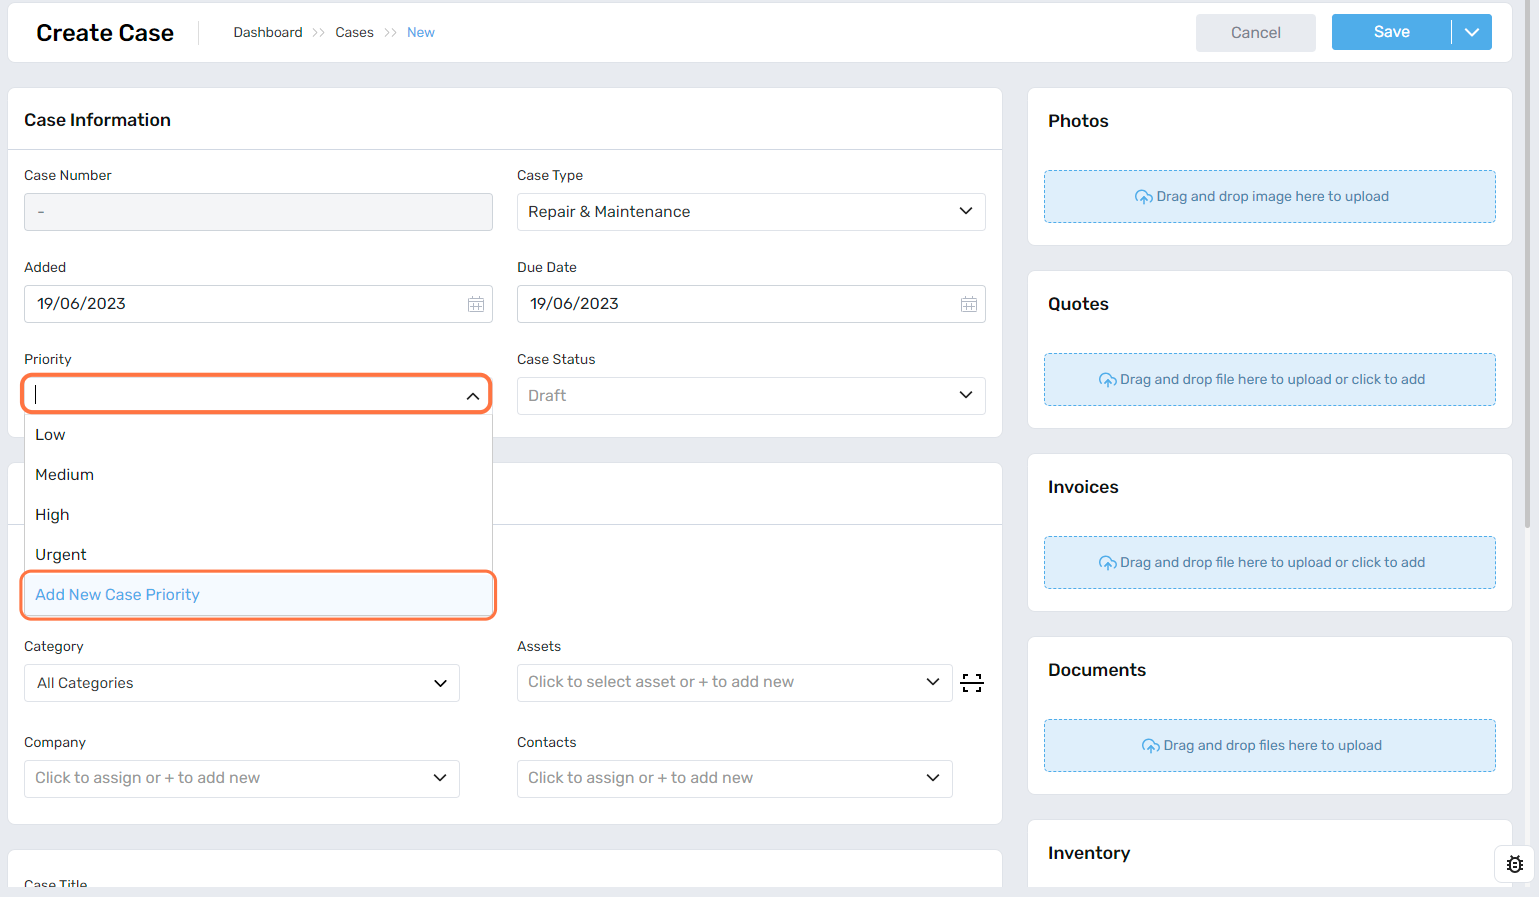
To Create a New Priority
Under Cases > Select New Case.
From within the case under Priority > scroll to the bottom and select Add New Case Priority.
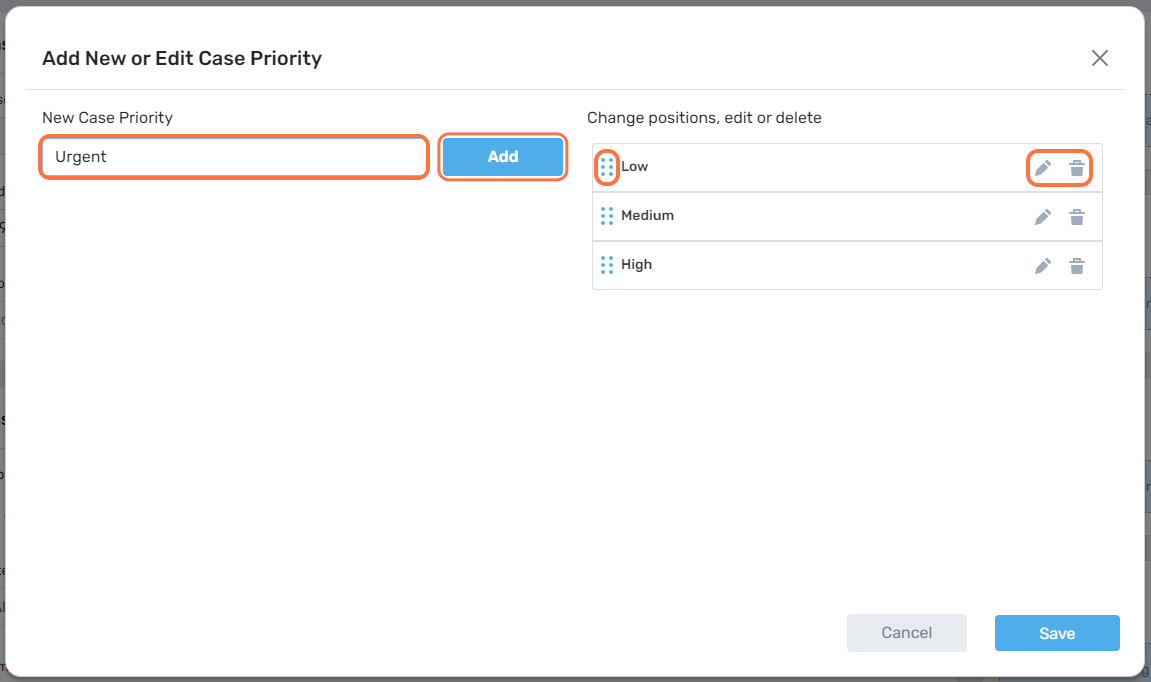
There are a few options from the pop-up that appears which includes:
- Under New Case Priority you can enter the new type > select Add.
- The 6 dots you can drag and drop to change the order the case priorities appear from the dropdown.
- Edit pencil allows you to edit the name of the case priority.
- Rubbish bin allows you to delete any case priorities. There will be an addition pop-up that will appear asking you "Are you sure you want to delete this?" where you can confirm to delete or close to cancel.
Please ensure after making any changes you select on Save.
To Create a New Case Status
Under Cases > Select New Case.
From within the case under Case Status > scroll to the bottom and select Add New Case Status.
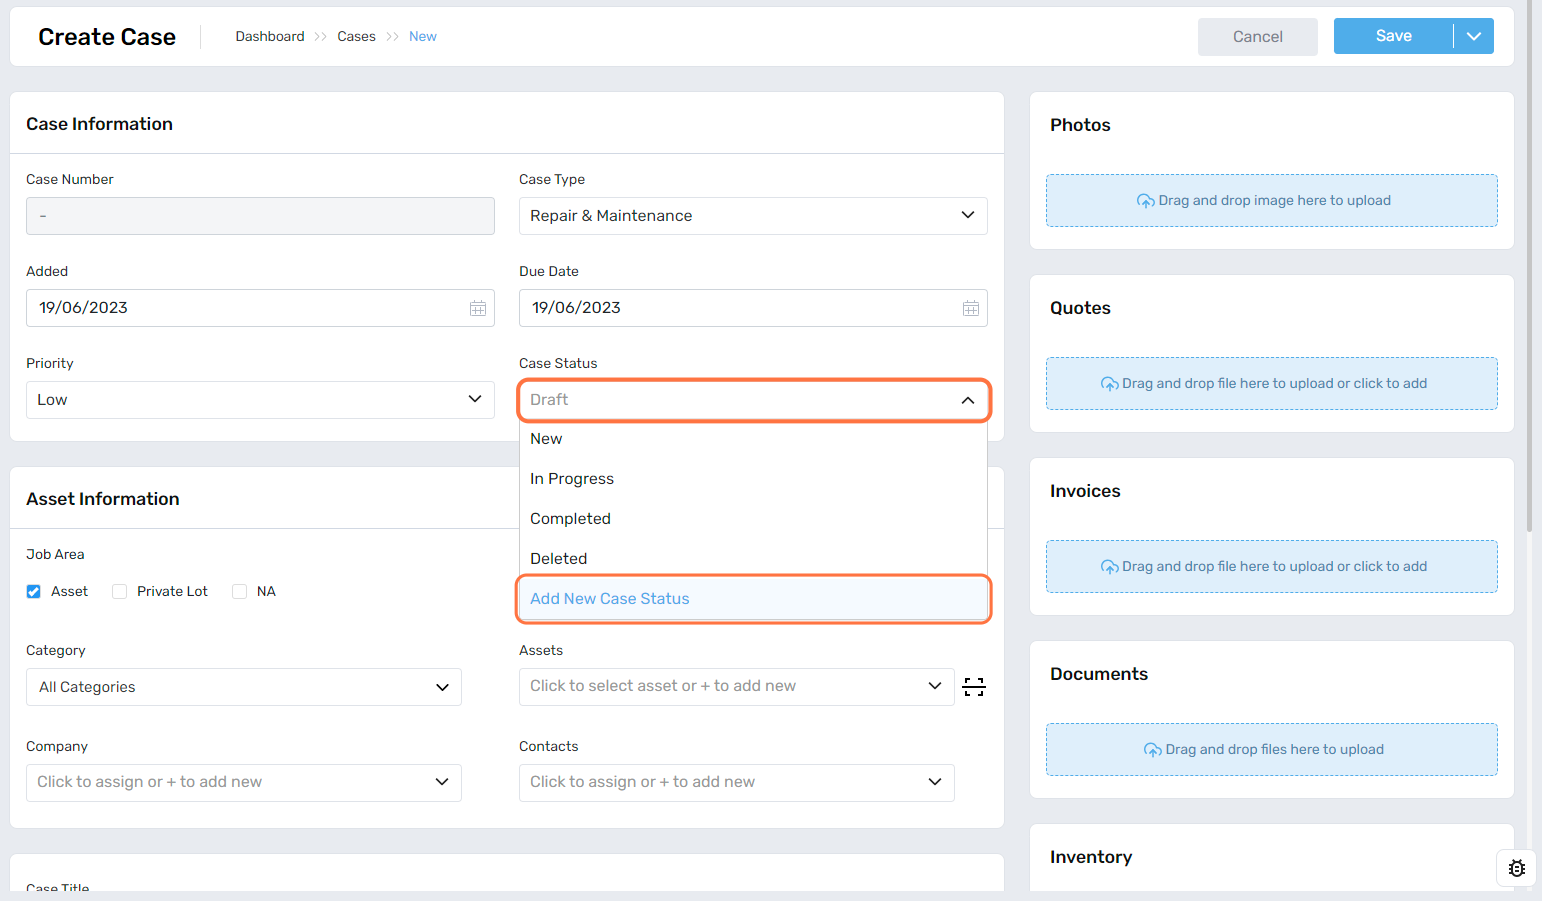
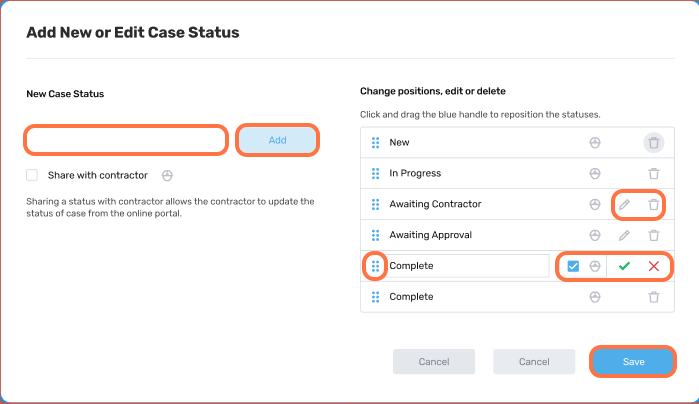
There are a few options from the pop-up that appears which includes:
- Under New Case Status you can enter the new type > select Add.
- The 6 dots you can drag and drop to change the order the case statuses appear from the dropdown.
- Contractor icon this will have a tick box when you have edited the status to show if you wish to share with the contractor the status through the online link of the case.
- Edit pencil allows you to edit the name of the case status, there will be a tick to save and a x to cancel.
- Rubbish bin allows you to delete any case statuses. There will be an addition pop-up that will appear asking you "Are you sure you want to delete this?" where you can confirm to delete or close to cancel.
Please ensure after making any changes you select on Save.
Creating Asset Categories and Assets From Within a Case
The ability to create additional assets and asset categories can be completed within a case.
Creating Asset Categories From Within a Case
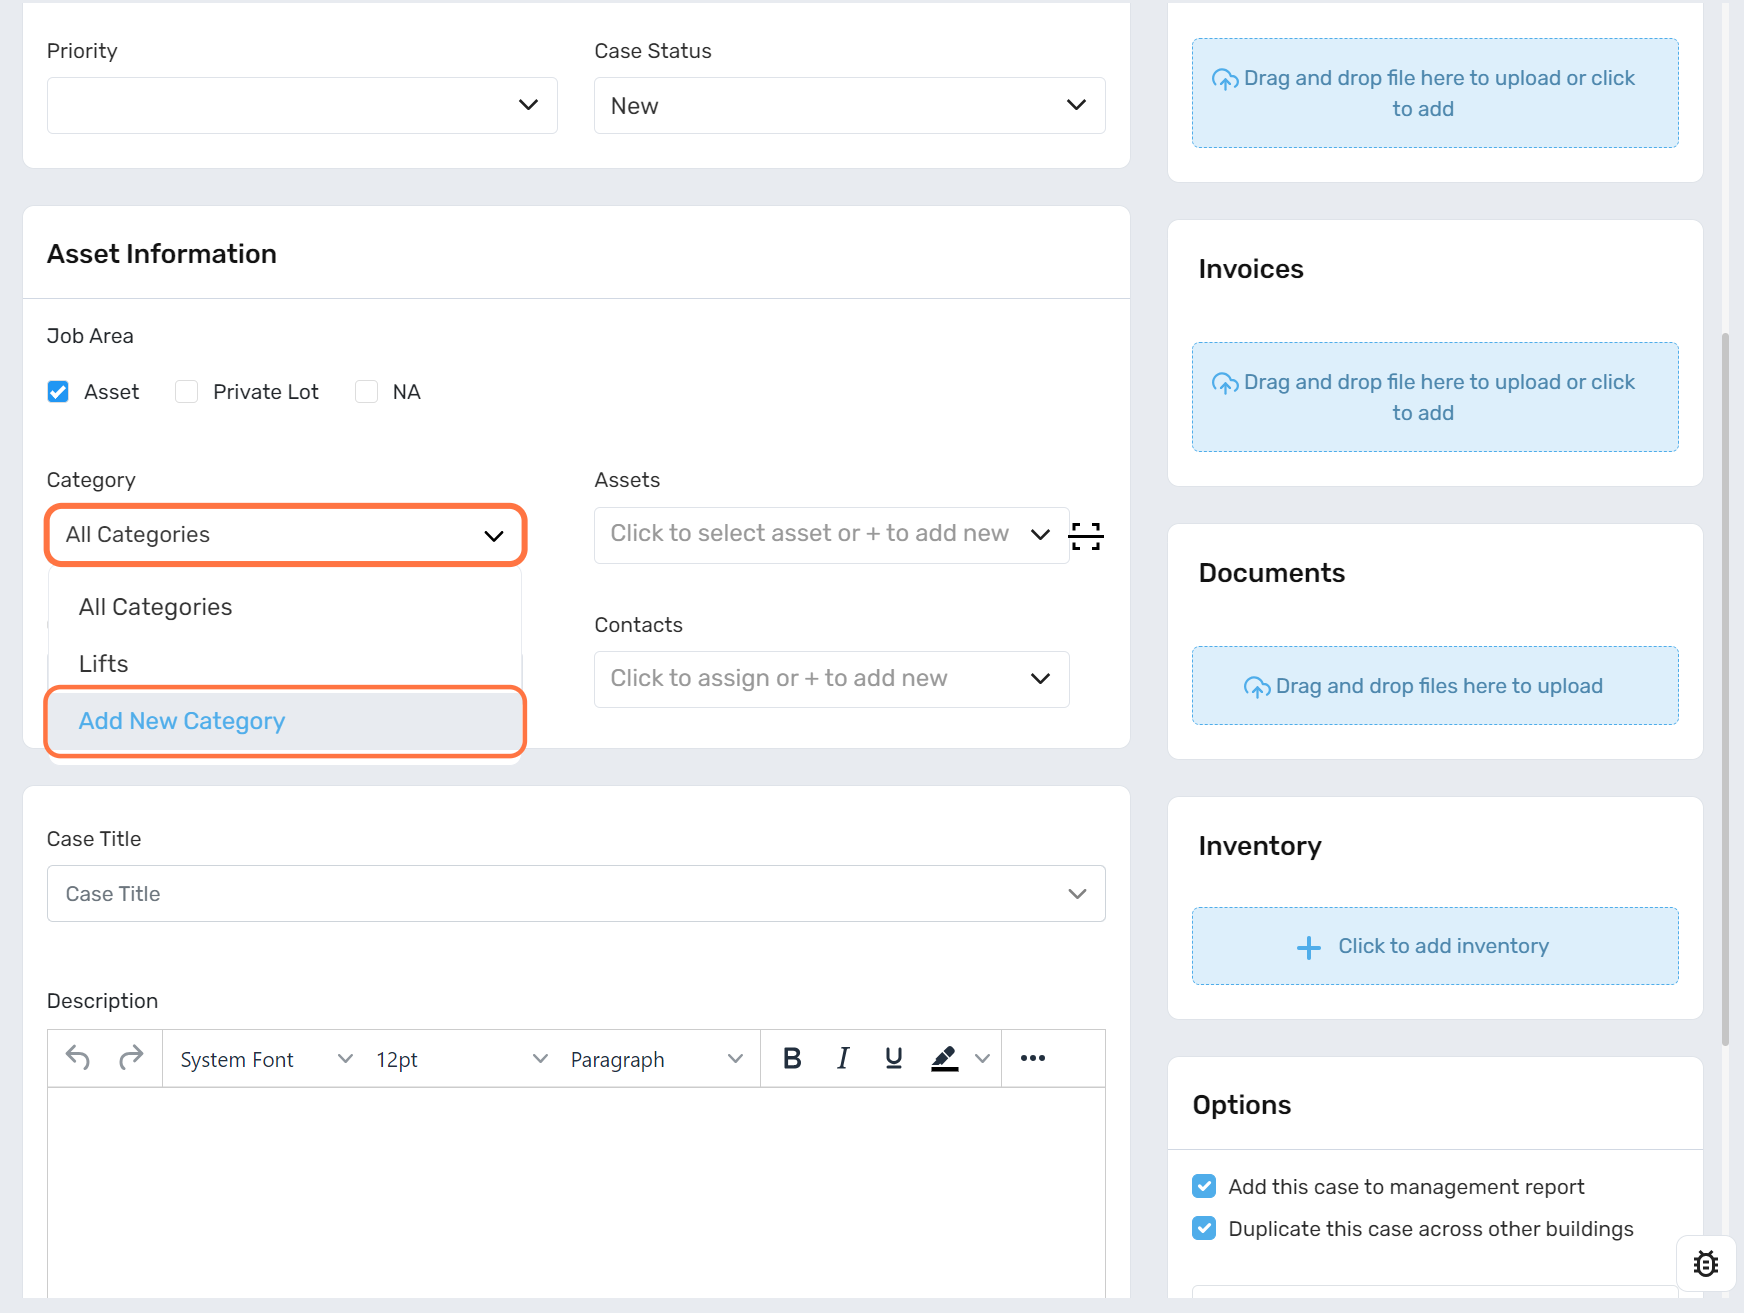
Under Cases > New Case.
Under the Asset Information > tick Asset > select All Categories and scroll to the bottom > select Add New Category.
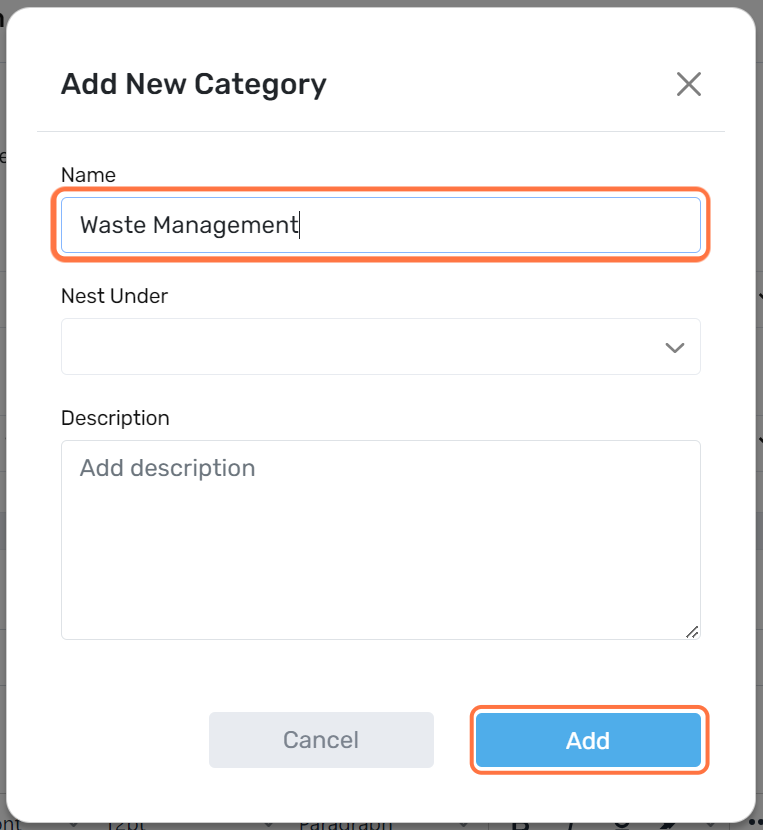
The below pop-up will appear where you can enter the following:
- Name - for the new asset category.
- Nest Under - if this needs to be setup as a sub-category of an existing category you can select from the Nest Under dropdown.
- Description - you can add a description for the category.
- Then click on Add to create.
Creating Assets Within a Case
Under Cases > New Case.
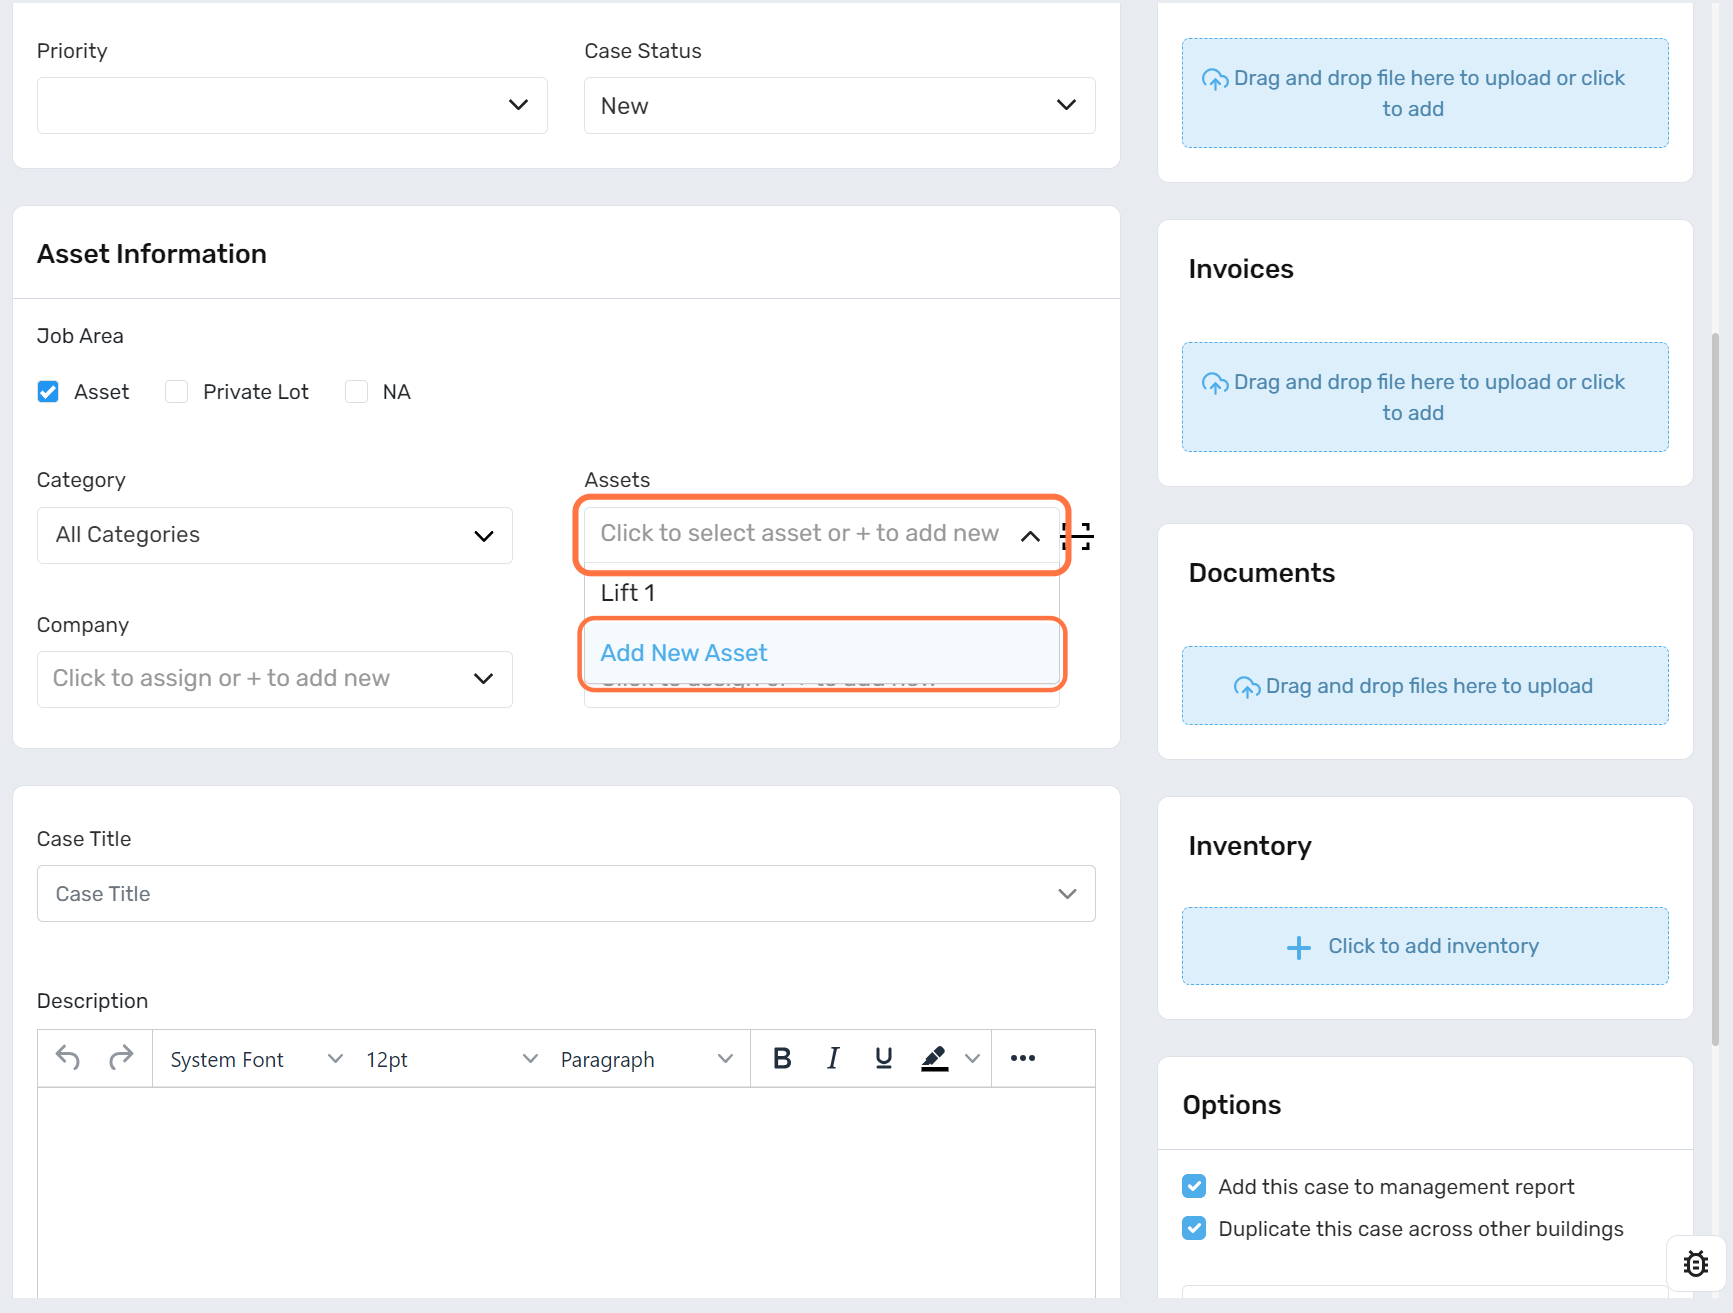
Under the Asset Information > tick Asset > select dropdown for Assets and scroll to the bottom > select Add New Asset.
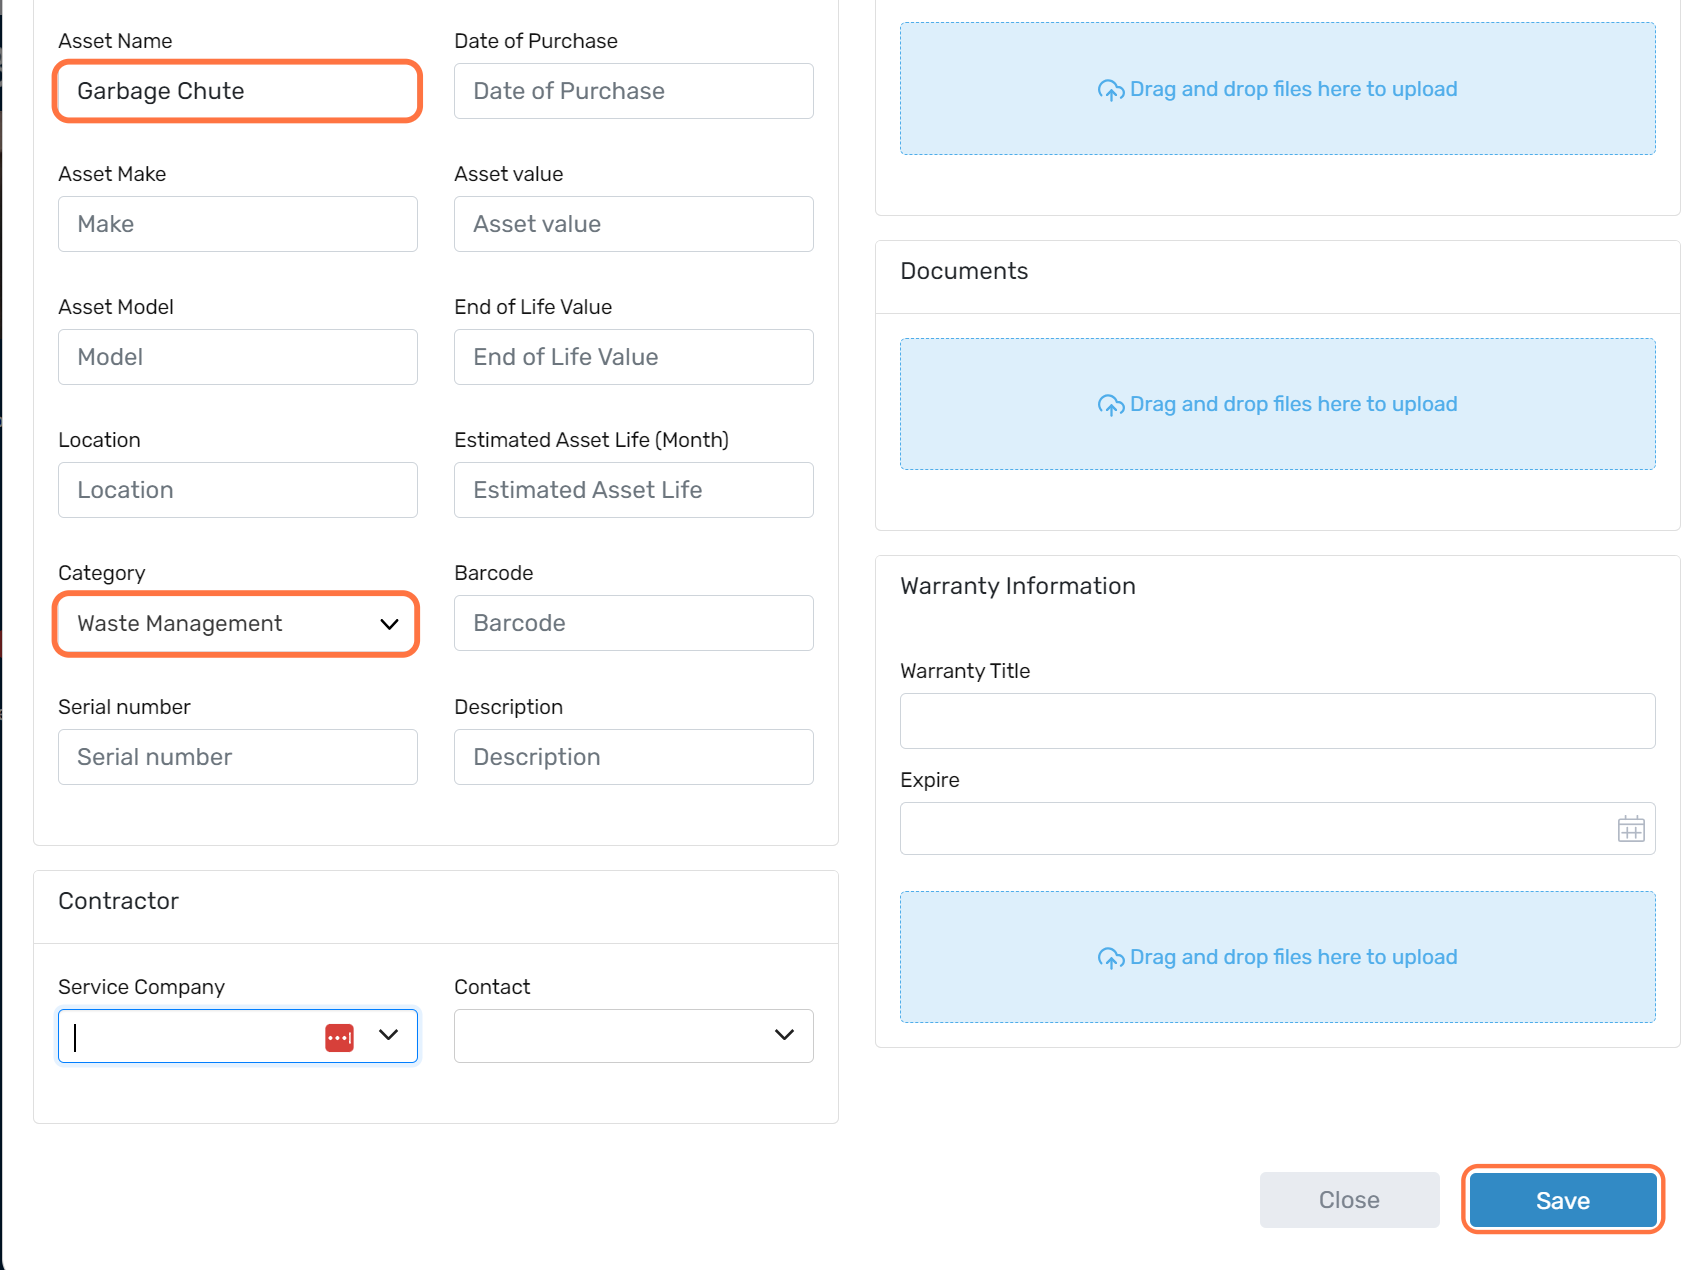
The below pop-up will appear to enter information on the asset, there are two mandatory fields Asset Name and Asset Category:
The following items can be attached:
- Photos
- Documents
- Warranty Information
Then select Save.
Once this has been created you will be taken back to the case where you can select the asset to add to the case.
Asset Information in Cases
Users have the ability to tag both assets and private lots within cases.
Under Cases > Select New Case or Select an Existing Case.
If you have selected an existing case please ensure you select Edit before any updates can be made.
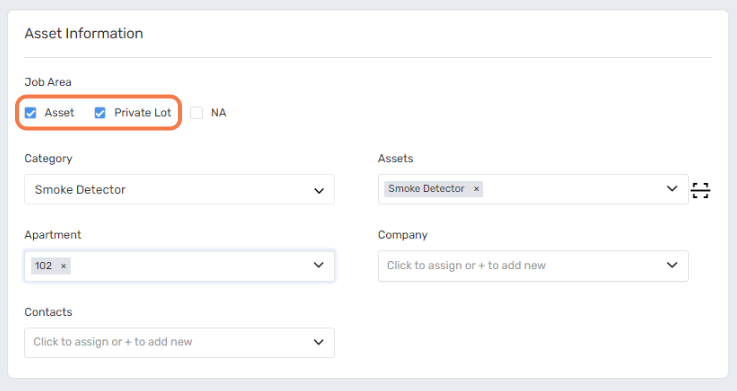
Under Asset Information > tick both Asset and Private Lot.
This will show fields for both Assets and Apartments which can be selected, more than one asset/apartment can be linked to a case.
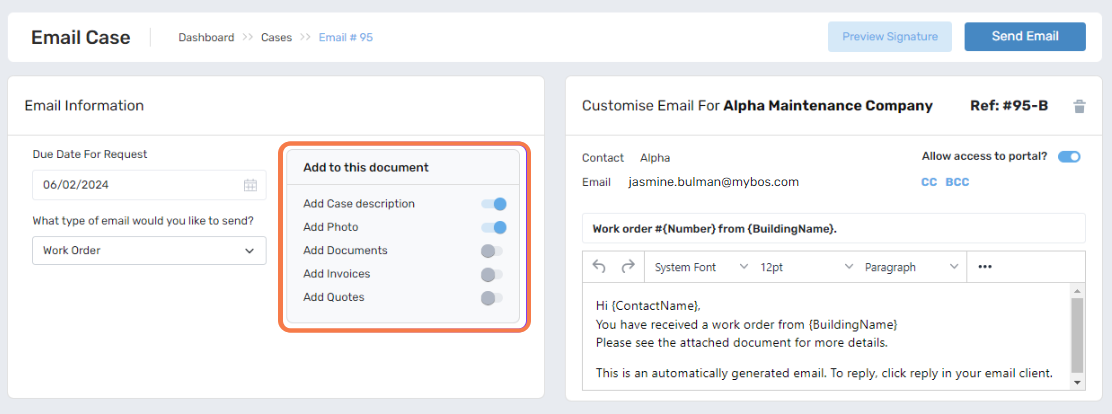
Email Case
When emailing out a quote, work order or case summary, you have the option of what to include within the document.
This includes the following:
- Add Case Description
- Add Photo
- Add Documents
- Add Invoices
- Add Quotes
The following are defaulted to show for the different emails:
- Quotes - case description and photos will be included.
- Work Orders - case description and photos will be included.
- Case Summary - case description, photos, documents, invoices and quotes will be included.
As these are toggles that can be turned on or off you can override them if needed. If the toggle is showing as blue this option will be included.