---
title: Invoice Approval
description: Learn how to use MYBOS Invoice Approval to help building and facility teams email invoice lists, update invoice statuses in bulk, filter invoices by status and date, and generate invoice approval reports from one centralised platform.
---
[Skip to content](https://support.mybos.com/knowledge-base/invoice-approval#main-content)
[More support](https://support.mybos.com/knowledge-base/kb-tickets/new?hsLang=en-au)
[](https://support.mybos.com/knowledge-base?hsLang=en-au)
- [Product Updates](https://productupdates.mybos.com/whats-new)
- [Getting Started](https://support.mybos.com/knowledge-base/getting-started)
- [Building Managers](https://support.mybos.com/knowledge-base/building-manager)
- [Administrators](https://support.mybos.com/knowledge-base/administrator)
- [Residents](https://support.mybos.com/knowledge-base/residents)
- [Training Academy](https://mybos.com/support/training-academy/)
Open main navigation
Close main navigation
- [Product Updates](https://productupdates.mybos.com/whats-new)
- [Getting Started](https://support.mybos.com/knowledge-base/getting-started)
- [Building Managers](https://support.mybos.com/knowledge-base/building-manager)
- [Administrators](https://support.mybos.com/knowledge-base/administrator)
- [Residents](https://support.mybos.com/knowledge-base/residents)
- [Training Academy](https://mybos.com/support/training-academy/)
- [More support](https://support.mybos.com/knowledge-base/kb-tickets/new)
- [Contact us](https://support.mybos.com/knowledge-base/contact-us)
[Contact us](https://support.mybos.com/knowledge-base/contact-us?hsLang=en-au)
How can we help you?
- There are no suggestions because the search field is empty.
1. [MYBOS Knowledge Base](https://support.mybos.com/knowledge-base?hsLang=en-au)
2. [Features](https://support.mybos.com/knowledge-base/features?hsLang=en-au)
3. [Building](https://support.mybos.com/knowledge-base/features?hsLang=en-au#building)
# Invoice Approval
## MYBOS Invoice Approval helps building and facility teams email invoice lists, update invoice statuses in bulk, filter invoices by status and date, and generate invoice approval reports from one centralised platform.
The Invoice Approval feature lets you email invoice lists from inside of the MYBOS platform, update invoice statuses to Pending, Under Review, or Approved, and generate invoice reports.
### How to Bulk Update Invoice Status and Generate Reports
### Step by Step Walkthrough
**Step 1:** Under the **Building** menu located on the left side**,** select **Invoice Approval**.
**💡 Tip**: Use this as a checklist to make sure you have processed your invoice e.g., Sent it to accounts/strata for payment action
#### Updating the Status of Invoices
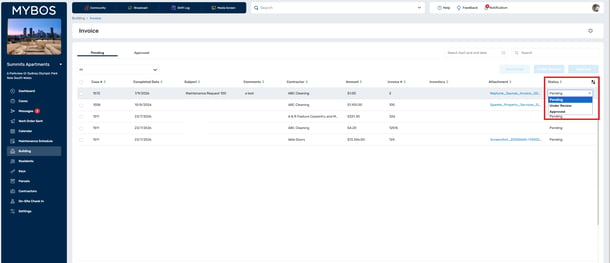
The statuses of invoices can be updated there are three different options:
- **Pending** - text of the status will show in black.
- **Under Review** - text of the status will show in red.
- **Approved** - text of the status will show in green.
**Step 2:** To update the status of a single invoice, hover over the current status and select the dropdown to choose a new one.
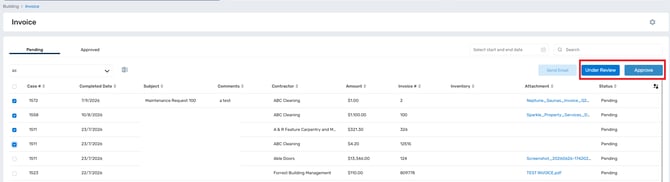
**Step 3:** To update in bulk you can either tick the invoices you wish to update or select all. Then you can select the status either **Under Review** or **Approve**.
#### Filter Options in Invoice Approval
Within Invoice Approval you can select to view either **Pending** invoices or **Approved** invoices.
Under Pending invoices, you can filter by the different statuses:
- **All**
- **Pending**
- **Under Review**
Within both Pending and Approved you have the date range filter where you can select the from and to date of invoices you wish to view.
### Invoice Approval Workflow
❗If the **Invoice Approved Email** notification is turned on, all invoices from completed Cases and Maintenance Events will automatically be sent to the Approved tab.
**Step 1:** Go to **Settings** ➔ **Email & Template Options** ➔ **Invoices**
**Step 2:** Ensure there is at least one email entered into the Manager Notification field
**Step 3:** Toggle the **Invoice Approved Email** button depending on your workflow:
- If **ON** ➔ when Cases/Maintenance Events are **Completed**, the Invoice will be automatically sent to tagged management emails and set to **Approved**
- If **OFF** ➔ when Cases/Maintenance Events are **Completed**, invoice will be sent to **Pending** where you will need to manually Approve invoices.
### Sending Invoices for Manual Approval
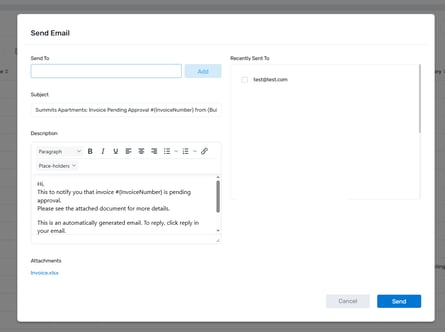
**Step 1**: Use the checkboxes to the left of each invoice to either send individual or bulk emails for further review by the Committee or team members. Click **Send Email**.

**Step 2:** In the pop up box, you can enter the following:
- **Send To:** enter the email address of the person you need to send this to.
- **Recently Sent To:** if you have previously sent invoice report the list of email addresses will appear and you can tick to select this email. You can as well send to multiple recipients by ticking multiple emails in the **Recently Sent To** section.
- **Subject:** enter the heading of the email.
- **Description:** enter in the message for the email.
- Select **Send**.
When sending an email to a contact, you have to select the checkbox from the list of contacts under **Recently Sent To**.
### Generating the Invoice Approval Report
**Step 1:** In the Invoice Approval feature, select either **Pending** or **Approved** invoices.
❗ To run the invoice approval report, please ensure you select the invoices you would like included. Tick all from the tick box at the top or individually select the invoices.
**Step 2:** Once the desired invoices are selected, an excel icon will show. Click the icon to begin generating the report.
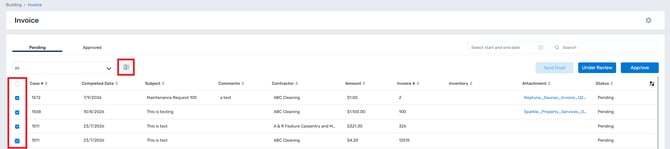
From here you can also bulk email the invoices to another party by following the steps above.
- [Getting Started](https://support.mybos.com/knowledge-base/getting-started?hsLang=en-au)
- [Features](https://support.mybos.com/knowledge-base/features?hsLang=en-au#main-content)
- [Building Manager Dashboard](https://support.mybos.com/knowledge-base/features?hsLang=en-au#building-manager-dashboard)
- [Community](https://support.mybos.com/knowledge-base/features?hsLang=en-au#community)
- [Marketplace](https://support.mybos.com/knowledge-base/features?hsLang=en-au#marketplace)
- [Cases](https://support.mybos.com/knowledge-base/features?hsLang=en-au#cases)
- [Messages](https://support.mybos.com/knowledge-base/features?hsLang=en-au#messages)
- [Calendar](https://support.mybos.com/knowledge-base/features?hsLang=en-au#calendar)
- [Maintenance Schedule](https://support.mybos.com/knowledge-base/features?hsLang=en-au#maintenance-schedule)
- [Building](https://support.mybos.com/knowledge-base/features?hsLang=en-au#building)
- [Keys](https://support.mybos.com/knowledge-base/features?hsLang=en-au#keys)
- [Parcels](https://support.mybos.com/knowledge-base/features?hsLang=en-au#parcels)
- [Contractors](https://support.mybos.com/knowledge-base/features?hsLang=en-au#contractors)
- [On-Site Check In](https://support.mybos.com/knowledge-base/features?hsLang=en-au#on-site-check-in)
- [Troubleshooting](https://support.mybos.com/knowledge-base/troubleshooting?hsLang=en-au#main-content)
- [FAQ](https://support.mybos.com/knowledge-base/troubleshooting?hsLang=en-au#faq)
- [Administrator](https://support.mybos.com/knowledge-base/administrator?hsLang=en-au#main-content)
- [Configuration](https://support.mybos.com/knowledge-base/administrator?hsLang=en-au#configuration)
- [MYBOS Web Platform](https://support.mybos.com/knowledge-base/administrator?hsLang=en-au#mybos-web-platform)
- [Reporting](https://support.mybos.com/knowledge-base/administrator?hsLang=en-au#reporting)
- [Building Manager](https://support.mybos.com/knowledge-base/building-manager?hsLang=en-au#main-content)
- [Building Managers - Web Portal](https://support.mybos.com/knowledge-base/building-manager?hsLang=en-au#building-managers-web-portal)
- [Building Configuration](https://support.mybos.com/knowledge-base/building-manager?hsLang=en-au#building-configuration)
- [Residents](https://support.mybos.com/knowledge-base/building-manager?hsLang=en-au#residents)
- [Maintenance & Work Orders](https://support.mybos.com/knowledge-base/building-manager?hsLang=en-au#maintenance-work-orders)
- [Communication](https://support.mybos.com/knowledge-base/building-manager?hsLang=en-au#communication)
- [Community & Amenities](https://support.mybos.com/knowledge-base/building-manager?hsLang=en-au#community-amenities)
- [Reporting](https://support.mybos.com/knowledge-base/building-manager?hsLang=en-au#reporting)
- [Integrations](https://support.mybos.com/knowledge-base/building-manager?hsLang=en-au#integrations)
- [Residents](https://support.mybos.com/knowledge-base/residents?hsLang=en-au#main-content)
- [Resident App](https://support.mybos.com/knowledge-base/residents?hsLang=en-au#resident-app)
- [Resident Web Portal](https://support.mybos.com/knowledge-base/residents?hsLang=en-au#resident-web-portal)
- [MYBOS Solutions](https://support.mybos.com/knowledge-base/mybos-solutions?hsLang=en-au)
- [Feature Updates](https://support.mybos.com/knowledge-base/feature-updates?hsLang=en-au)
[](http://mybos.com)
Suite 1.01 Level 1, 6 Parkview Drive
Sydney Olympic Park
New South Wales, 2127
Australia
Copyright © 2026, mybos.com