
All features (contractors, assets, residents, maintenance schedules and cases) can be updated and created as you go, or uploaded in bulk using the Database Upload feature.
Contents:
- Uploading Contractor Database
- Uploading Asset Database
- Uploading Resident Database
- Uploading Maintenance Schedule
- Uploading Cases Database
❗If this is your first time uploading data, it is efficient to use Database Upload for contractors, assets, and residents. Maintenance schedules and cases can be created later as needed, as they are quick and easy to set up directly in MYBOS.
How to Upload Contractors Database
Step by Step Walkthrough
Step 1: In the Building Manager portal, on the left hand menu click the Settings menu
Step 2: Under the Others section of settings, Click Database Upload
Step 3: Under the Contractors database section, click Download template (XLS) to download the excel template.
Step 4: Open the downloaded spreadsheet, it will be completely blank and look like this:
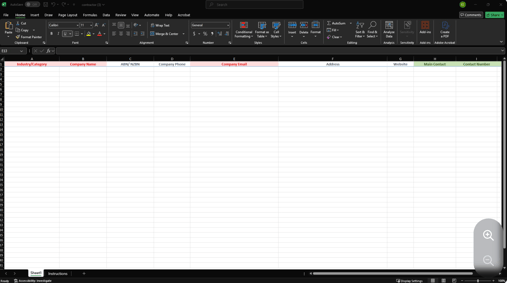
❗ Columns that are RED are mandatory, skipping them will cause the upload to fail. Columns that are GREEN are mandatory if you are adding a contact person.
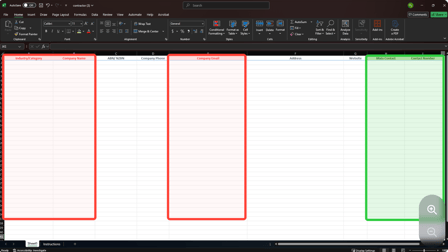
Step 5: Ensure to click the "Enable Editing" button located at the top of the spreadsheet. Begin filling out the relevant details of your first contractor.
Step 6: If you are adding a contact person tied to your contractor (highly recommended), all green fields will need to be completed (Main Contact, Contact Number, Contact Email).
Step 7: Complete the same steps for the rest of your contractors.
Step 8: When you have inputted all of your contractors, click the Save icon in the top left.
Step 9: Navigate back to the database upload section in Step 3, click the blue upload box to upload your resident database file.
Step 10: Click Start to upload the file to MYBOS.
Step 11: A successful upload will say "X items added, 0 skipped", meaning that the entire upload was successful. If the update informs you that some items have been skipped you will need to check the upload report and rectify the issue. For more information click here.
How to Upload Assets Database
Step by Step Walkthrough
Step 1: In the Building Manager portal, on the left hand menu click the Settings menu
Step 2: Under the Others section of settings, Click Database Upload
Step 3: Under the Assets database section, click Download template (XLS) to download the excel template.
Step 5: Ensure to click the "Enable Editing" button located at the top of the spreadsheet. Begin filling out the relevant details of your first asset. Any field that is red IS mandatory.
Step 6: From the spreadsheet upload, Assets can be linked to Contractors. This can only be done if you already have Contractors in the system. Otherwise, you can leave this blank and attach contractors to assets later on.
💡 We recommend uploading contractors FIRST for the most efficient MYBOS experience.
Step 7: Complete the same steps for the rest of your contractors.
Step 8: When you have inputted all of your contractors, click the Save icon in the top left.
Step 9: Navigate back to the database upload section in Step 3, click the blue upload box to upload your resident database file.
Step 10: Click Start to upload the file to MYBOS.
Step 11: A successful upload will say "X items added, 0 skipped", meaning that the entire upload was successful. If the update informs you that some items have been skipped you will need to check the upload report and rectify the issue. For more information click here.
How to Upload Residents Database
In MYBOS, the resident database upload allows you to bulk upload resident data, however, this can also be done by Residents themselves, which is the recommended action -- especially if you are allowing residents access to the Resident Portal. Residents can upload their own data but you will need to have apartments created FIRST.
Step by Step Walkthrough
Step 1: In the Building Manager portal, on the left hand menu click the Settings menu
Step 2: Under the Others section of settings, Click Database Upload
Step 3: Under the Residents database section, click Download template (XLS) to download the excel template.
Step 4: Open the recently downloaded file. Once it has opened in Excel, ensure the click the Enable Editing button, otherwise you will be unable to input your own data to the template.
Step 5: Complete the Apartment Number column. In this template, you can also enter the remaining resident details for each resident, which will take more time to complete. If you prefer to only bulk upload apartments and have residents enter their own details when they register, simply complete the Apartment Number column only.
❗ Although names are red, when the Apartment Number column is filled out on its own, the upload will be successful.
Step 6: Continue typing all apartment numbers.
💡 For faster input in Excel:
-
Type the first two apartment numbers in the correct sequence (for example, 101 and 102) in the Apartment Number column.
-
Next, highlight both cells so that Excel recognises the pattern. Move your cursor to the bottom-right corner of the highlighted cells until the small fill handle (a black cross) appears, then click and drag down over the remaining cells.
-
Excel will automatically continue the sequence and fill the rest of the apartment numbers in order, saving you from having to enter each number manually.
Step 7: Once completed, Click the Save icon in the top left corner of Excel.
Step 8: Navigate back to the Database Upload portal. In the blue upload box, click to upload your resident database file.
Step 9: Click Start to upload the file to MYBOS.
Step 10: A successful upload will say "X items added, 0 skipped", meaning that the entire upload was successful. If the update informs you that some items have been skipped you will need to check the upload report and rectify the issue. For more information click here.
If you would like detailed information on adding residents, click here.
How to Upload the Maintenance Schedule Database
We recommend entering maintenance schedules using the “New” button on the Maintenance Schedule home screen, as this is quicker, less tedious, and can be done on the go. The Database Upload feature is best suited for Building Managers who already have an existing maintenance schedule database that can be easily reformatted into our templates.
Step by Step Walkthrough
Step 1: In the Building Manager portal, on the left hand menu click the Settings menu
Step 2: Under the Others section of settings, Click Database Upload
Step 3: Under the Maintenance Schedule database section, click Download template (XLS) to download the excel template.
Step 4: Open the recently downloaded file. Once it has opened in Excel, ensure the click the Enable Editing button, otherwise you will be unable to input your own data to the template.
Step 5: Begin filling out the form by inputting the Start Date of the Maintenance Schedule.
❗ Ensure the Start Date is written as "DD/MM/YYYY" otherwise it will not upload correctly.
Step 6: Update the Frequency of the Maintenance Schedule by selecting an option in the drop down menu
Step 7: Add a subject (title) for the Maintenance Schedule.
These are all the mandatory fields you need to fill out for a maintenance schedule database upload to be successful. You can continue filling out the other relevant fields such as:
- End date
- Asset ❗
- Apartment
- Contractor ❗
- Description
- Send Email Notification
- Send Before Time
❗ Asset and Contractor will need to have been already inputted into MYBOS first. Otherwise, they will not link. You can always connect these after in the Maintenance Schedule feature.
Step 8: Once completed, Click the Save icon in the top left corner of Excel.
Step 9: Navigate back to the Database Upload portal. In the blue upload box, click to upload your resident database file.
Step 10: Click Start to upload the file to MYBOS.
Step 10: A successful upload will say "X items added, 0 skipped", meaning that the entire upload was successful. If the update informs you that some items have been skipped you will need to check the upload report and rectify the issue. For more information click here.
How to Upload the Cases Database
We recommend entering maintenance schedules using the “New” button on the Cases home screen, as this is quicker, less tedious, and can be done on the go. The Database Upload feature is best suited for Building Managers who already have an existing Cases database that can be easily reformatted into our templates.
Step by Step Walkthrough
Step 1: In the Building Manager portal, on the left hand menu click the Settings menu
Step 2: Under the Others section of settings, Click Database Upload
Step 3: Under the Cases database section, click Download template (XLS) to download the excel template.
Step 4: Open the recently downloaded file. Once it has opened in Excel, ensure the click the Enable Editing button, otherwise you will be unable to input your own data to the template.
❗ Before filling out the cases database, the following fields will need to be set up beforehand and match what is already in MYBOS:
To learn more about each setup, click the relevant name to open its article.
To check your default statuses, priorities and types navigate to Settings > Categories and Descriptions and navigate through the relevant tabs to view and verify their categories.
Step 5: Fill out all relevant case details including case type, start date, due date, case priority etc. Any field with red text is mandatory and must be filled out.
Step 6: Once completed, Click the Save icon in the top left corner of Excel.
Step 7: Navigate back to the Database Upload portal. In the blue upload box, click to upload your resident database file.
Step 8: Click Start to upload the file to MYBOS.
Step 9: A successful upload will say "X items added, 0 skipped", meaning that the entire upload was successful. If the update informs you that some items have been skipped you will need to check the upload report and rectify the issue. For more information click here.