
The Contractors area in the Company portal lets you manage your contractors across all of your buildings from one place. You can see every contractor, decide which buildings each one can be used at, keep their insurance up to date, and tidy up duplicates, without opening each building separately.
Access: Check you're an Admin user by clicking on your profile/Initials in the top right corner, and select Switch to Company Portal ➔ Contractors.
In the Company Portal, a Contractor can be owned by a single building or by the company itself. Contractors owned by the company can be designated to as many buildings as you choose.
Quicklinks
Main Contractors Page
The page has five tabs. Use New Company at the top right to add a contractor company, or New Contact when you are on the Contacts tab.
|
Tab |
What it shows |
|---|---|
|
Companies |
One row for each contractor company. Columns: Name, Location, Phone, Category, Email, Number of Contacts |
|
Contacts |
One row for each contact person. Columns: Company, Owner, Contact, Phone, Email, Category |
|
Expired Insurance |
Insurance and documents that have passed their expiry date. Columns: Contact, Company, Usage, Phone, Email, File Name, Expiry Date, Auto Reminder |
|
Pending Approval |
Insurance and documents submitted by contractors that are waiting for you to review. The number beside the tab shows how many are new |
|
Archive |
Contractors that have been archived |
Filters and search
Use Search to find a Contractor by name. On the Companies and Contacts tabs you can also filter by All Categories and All owners, and the Contacts and Expired Insurance tabs add an All Company filter. Choose how many entries to show per page (10, 20, 50, 100, 500 or 1000) and move between pages at the bottom of the list. The column icon at the top right of the list lets you choose which columns to display.
Location and owner
The Location column (called Owner on the Contacts tab) shows who the Contractor belongs to. Hover over the information icon next to the heading to read: "Indicates the contractor's location or owner." A building name in orange means the contractor belongs to that building. Your company's name in plain text means the contractor is owned by the company.
Row icons
Two icons appear at the end of each contractor's row on the Companies tab:
|
Icon |
What it does |
|---|---|
|
Building
|
Opens the Designate Contractor ... To Buildings window, where you choose which buildings the contractor is available at (see Designating Contractors to Buildings below). |
|
Share
|
Shows which buildings the contractor has been shared across. It is a quick, concise view of the contractor's building designations, so you do not need to open the designation window or the contractor's profile to see them. |


Designating Contractors to Buildings
Designating makes a contractor available at the buildings you choose, so you only keep one record for the contractor.
Step 1: On the Companies tab, find the contractor.
Step 2: Click the building icon at the end of the contractor's row. The Designate Contractor ... To Buildings window opens and lists your buildings, showing Name, Strata Plan, Apartments, Address, Suburb and State.
Step 3: Tick each building the contractor should be available at.
Step 4: Click Save. To leave without changing anything, click Close.
You can also tick several contractors, then click the building icon above the list to designate them all at once.
Moving a Contractor to the Company
Use Move to Company to change a contractor's owner from a building to the company, so that it can be shared across buildings.
Step 1: Tick the contractor on the Companies tab.
Step 2: Click Move to Company. A message confirms the move: "Successfully moved contractor(s) owner from building to target company."
Note: The move happens straight away, with no confirmation window. After it, the contractor's Location changes from the building to your company name. Check you have ticked the right contractor before you click.
Exporting, Archiving and Deleting
When you tick one or more contractors on the Companies tab, icons appear above the list for Export, Archive, Delete and Designate. Hover over an icon to see its name. Archived contractors are listed on the Archive tab.
Merging Contractors
Merging combines duplicate Contractor records (for example, the same locksmith added separately by two buildings) into one contractor, so that insurance, contacts and building designations are managed in a single place. Merging is done in the Company Portal only, because contractors cannot be edited at the building level.
Before you start
- Find the duplicates first. Open Contractors in each building and compare company names, contact details and documents so you know which record is the most complete.
Step 1: Select the duplicates
In the Company Portal, go to Contractors and open the Companies tab. Tick the contractors you want to combine (for example, two records for the same company). The Merge button stays greyed out until at least two are ticked.
Step 2: Click Merge
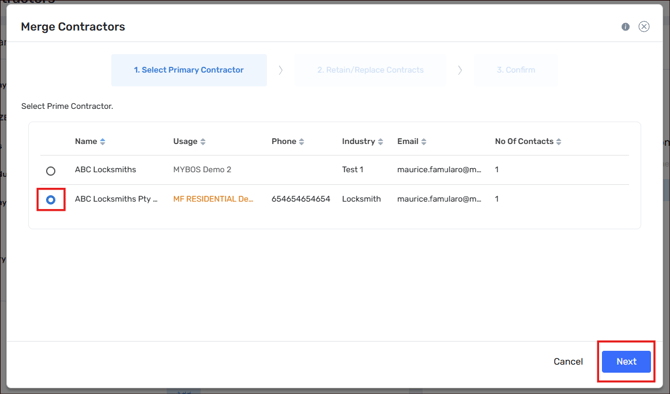
Click Merge. The Merge Contractors window opens with three steps: 1. Select Primary Contractor, 2. Retain/Replace Contracts, and 3. Confirm. Cancel closes it without changing anything.
Step 3: Choose the primary contractor
Tick the radio button next to the record you want to keep, then click Next. The table shows each record's name, usage (the building or company it belongs to), phone, industry, email and number of contacts. All other duplicates are merged into the primary, and all their associations are moved to it, so choose the record with the most accurate company details.
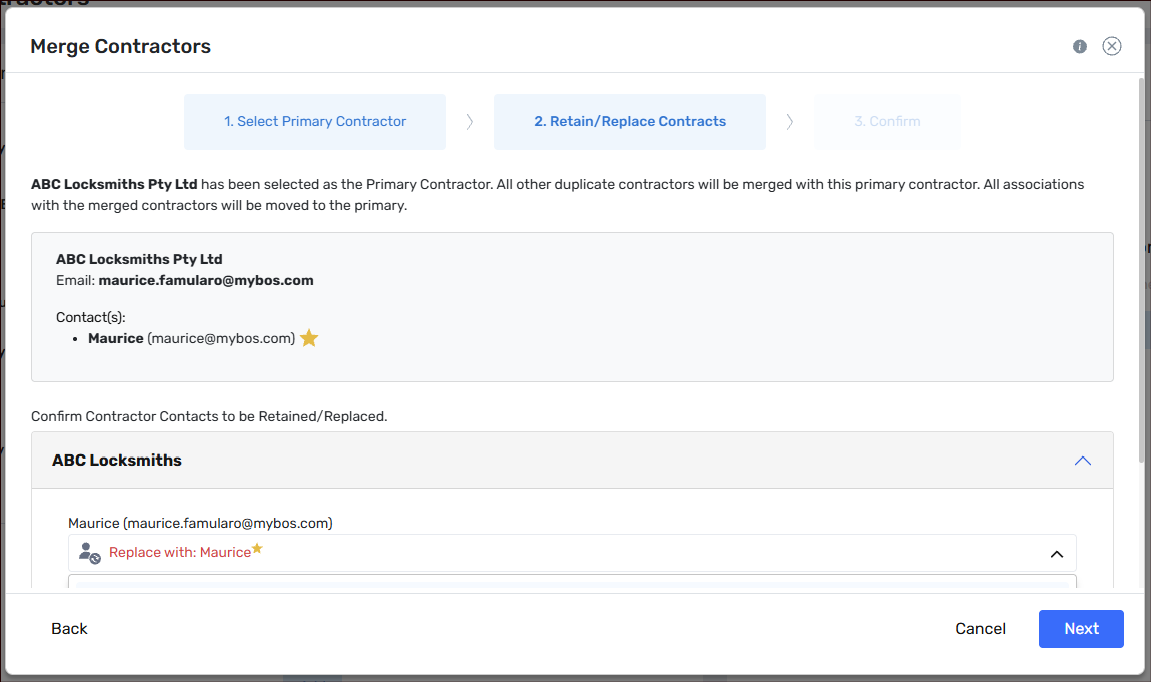
Step 4: Decide what to do with contacts
The window shows the primary contractor's company details and contacts, then a panel for each duplicate listing its contacts. For each duplicate contact, use the drop-down to choose Replace with: (map it to one of the primary's contacts) or retain it as a contact on the primary.
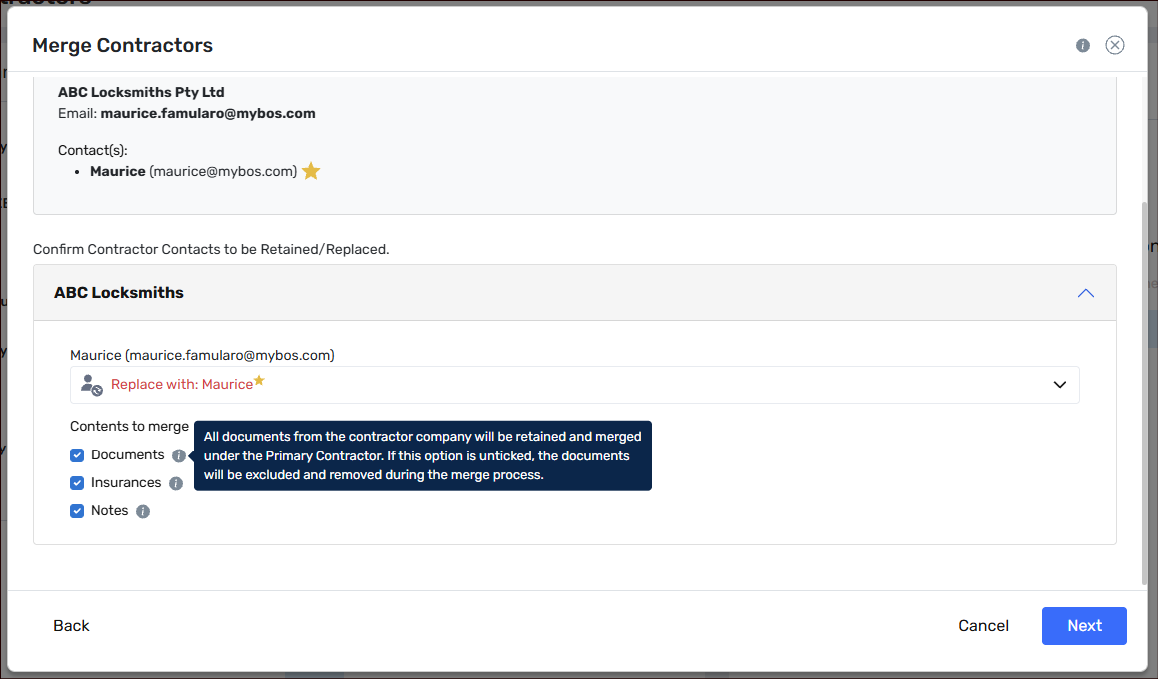
Step 5: Decide what to do with insurance documents
Under Contents to merge, each duplicate has three ticked boxes: Documents, Insurances and Notes. Leave a box ticked to retain that item and merge it under the primary contractor. Click Next when you are happy.
❗ If Documents, Insurances and Notes are unticked, they will be excluded and removed during the merge, which cannot be undone.
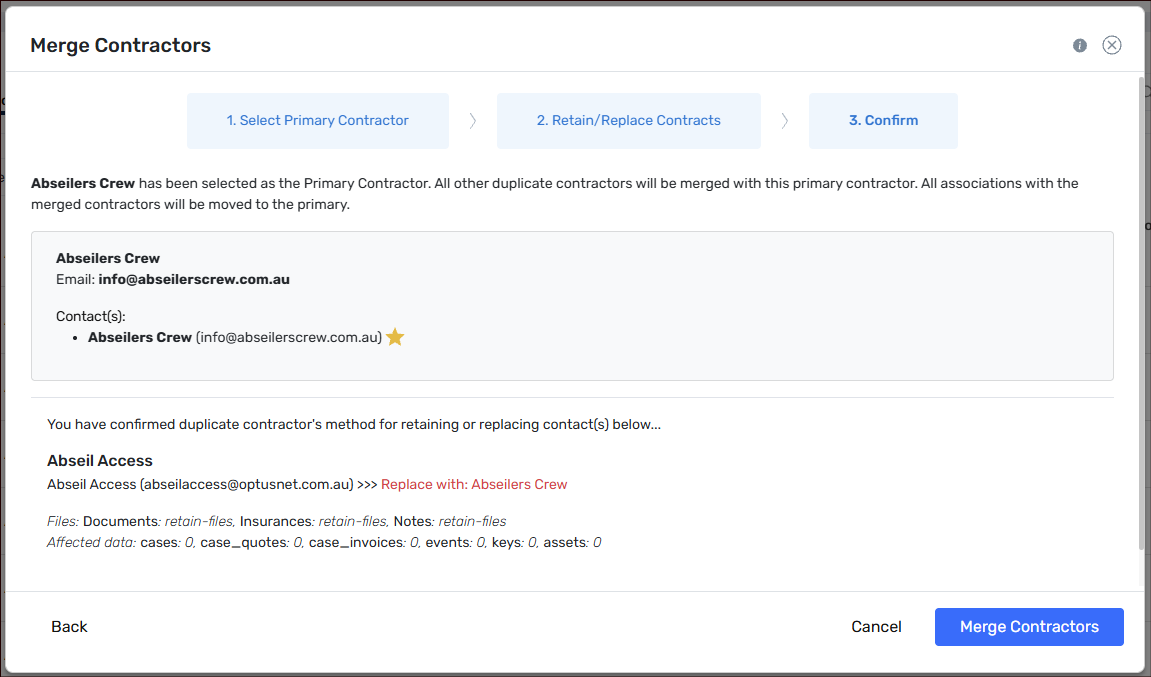
Step 6: Confirm the merge
This summarises the Primary Contractor, how each contact will be retained or replaced, whether Documents, Insurances and Notes are retained, and the affected data counts (cases, case quotes, case invoices, events, keys and assets). Review it, then click Merge Contractors. A green "Successfully executed merging of contractors" message appears and the window says the merge is in progress. You can close the window, and an email notification is sent once the merge is complete.
What happens after a merge
- The duplicate records become a single contractor that is linked across buildings.
- The contacts and insurance documents are kept or removed according to the choices you made in Steps 4 and 5.
- Tracking is simpler, because expired insurance and auto reminders are handled against one contractor instead of several.
- You can designate the merged contractor to additional buildings afterwards (see Designating Contractors to Buildings above).
- Check the merged contractor's notes and documents and delete anything that is now out of date.
Managing Insurance
The Expired Insurance tab lists documents and insurance policies that have expired across all of your buildings. The Usage column shows which building or company each one belongs to, and the Auto Reminder column shows whether automatic reminders are on for it.
Step 1: Open the Expired Insurance tab.
Step 2: Use All Company and All Categories to narrow the list.
Step 3: Tick the contractors you want to remind. The Send Email button is greyed out until at least one is ticked.
Step 4: Click Send Email to send the reminder.
The Pending Approval tab shows insurance and documents contractors have submitted for you to review, with the contractor's name, the building or company, the expiry date and the type of document, such as Public and Products Liability or Policy Schedule.
Email Templates and Auto Reminders
Click the cog icon at the top right of the Contractors page to open the settings menu:
- Edit Email Template changes the wording of the reminder email sent to contractors.
- Manage Auto Reminders lets you turn automatic reminders on or off and choose how often they are sent.
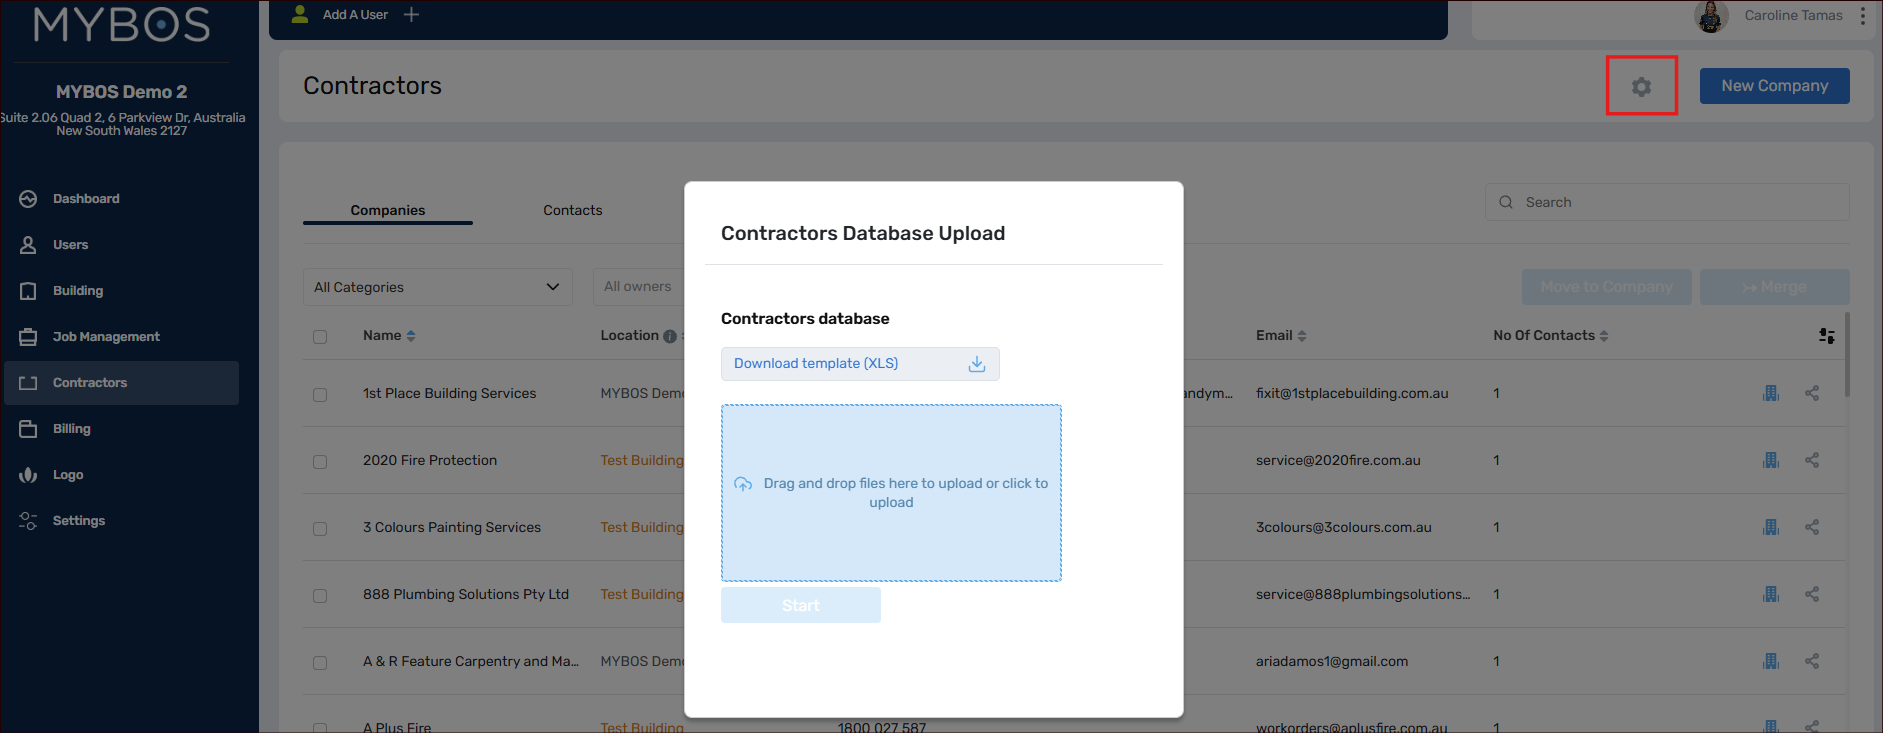
- Database Upload lets you add many contractors at once from a spreadsheet.
For step-by-step instructions on the email template and auto reminders, see the help article on using Contractors in the building portal.
Uploading Contractors in bulk
Step 1: Click the cog and select Database Upload.
Step 2: Click Download template (XLS) and fill in the spreadsheet.
Step 3: Drag the completed file into the upload box, or click the box to choose it.
Step 4: Click Start.
Video Walkthrough
Tips and FAQs
What does the Location column mean? It shows who owns the contractor. A building name in orange means the contractor belongs to that building. Your company's name means the company owns it.
How do I make a contractor available at more than one building? Click the building icon at the end of the contractor's row, tick the buildings and click Save.
What does Move to Company do? It changes the contractor's owner from a building to the company. It happens immediately without asking you to confirm, so check your selection first.
Why are Move to Company and Merge greyed out? They only become available when you tick a contractor. Merge needs more than one contractor to be ticked.
Why is the Send Email button greyed out on the Expired Insurance tab? Tick at least one row first.
Where do I see insurance that contractors have uploaded for approval? Open the Pending Approval tab.
How do I find contractors in a particular trade? Use the All Categories filter on the Companies or Contacts tab.
How do I find the contractors owned by one building? Use the All owners filter and choose the building.
Can I add lots of contractors at once? Yes. Click the cog, select Database Upload, download the template, fill it in and upload it.
Where do I change the reminder email or turn automatic reminders on or off? Click the cog at the top right of the Contractors page and choose Edit Email Template or Manage Auto Reminders.